Blog

  • How to Grow a Real Christmas Tree in your Garden

    How to Grow a Real Christmas Tree in your Garden

    Growing a real Christmas tree in your garden can be a rewarding and sustainable way to benefit from the same Christmas tree every festive season, as well as benefitting from it being part of the fabric of your garden all year round. By carefully choosing the best variety for you and your garden, planting in the right conditions, and providing the right after-care, you can enjoy the beauty of a real tree that becomes more established with each passing year. This guide will walk you through the entire process, from selecting the right tree to caring for it in the long term.

    1. Different Types of Real Christmas Trees

    There are several types of Christmas trees that are suitable for growing in gardens, each with its own unique characteristics. Here’s a breakdown of some of the most popular varieties:

    • Nordmann Fir (Abies nordmanniana)
      Known for its lush, dark green foliage and excellent needle retention, the Nordmann Fir is one of the most popular Christmas tree varieties. It’s a slow grower, but it’s hardy and has a symmetrical shape, making it perfect for garden planting.
    • Norway Spruce (Picea abies)
      A traditional Christmas tree variety, the Norway Spruce has a lovely fragrance and soft needles. The drawback of a Norway Spruce as a cut tree is it’s weaker needle retention after being cut, but this is of course not an issue for trees grown in the garden. They are fast growers are thrive in full sun.
    • Fraser Fir (Abies fraseri)
      This tree is well known for its compact shape and long-lasting needles. Its aromatic scent and attractive blue-green foliage make it a popular choice. Fraser Fir has been one of the most popular Christmas trees in the US for some time. In fact, it has been the Christmas tree used in the White House more often than any other variety!
    • Noble Fir (Abies procera)
      With its elegant, bluish-green needles, the Noble Fir is a great choice for a garden Christmas tree. It’s a slow grower, which makes it ideal for smaller spaces. Noble Firs are highly durable, have excellent needle retention, and a pleasant fragrance.
    • Blue Spruce (Picea pungens)
      Known for its striking silvery-blue needles, the Blue Spruce is a very distinctive tree. It’s a slower-growing variety and does well in dry, well-drained soil. It’s also particularly hardy, making it a good choice for harsher climates.
    • Lodgepole Pine (Pinus contorta)
      This tree offers long, slender needles and a straight trunk, making it perfect for smaller gardens or spaces. The Lodgepole Pine is fast-growing and tolerant of a wide range of conditions, although it prefers a slightly acidic, well-drained soil.

    2. Soil and Conditions Preferred by Christmas Trees

    Christmas trees are fairly adaptable when it comes to soil types and conditions, but they do have some preferences to ensure they thrive. In general, they can grow in most soils, as long as the ground is not too wet. Excess moisture can lead to root rot, which is detrimental to the tree’s health.

    Many Christmas trees are native to mountainous regions, so they are naturally hardy and able to withstand colder climates. As a result, they generally thrive in areas with cool temperatures and plenty of sunlight. Some varieties, such as the Fraser Fir and Lodgepole Pine, are more tolerant of warmer climates, while others, like the Norway Spruce, prefer cooler conditions.

    • Soil: A well-drained, slightly acidic soil is ideal for most Christmas tree varieties. Sandy or loamy soils are preferred, but heavier clay soils can be improved by adding organic matter and grit to ensure proper drainage.
    • Conditions: Christmas trees thrive in sunny spots, but they can tolerate partial shade. However, planting them in full sun allows them to grow at their best, particularly for varieties like the Norway Spruce and Blue Spruce.

    3. Considering Planting Location

    When choosing a spot in your garden for your Christmas tree, it’s important to take into account the tree’s future size. Most Christmas tree varieties can grow to a considerable height and width, so proper spacing is essential to avoid crowding.

    • Height: Christmas trees are generally tall, and their height can range from 5 to 15 meters or more, depending on the variety. Some trees, like the Nordmann Fir and Norway Spruce, can grow quite large over time, while others, like the Noble Fir and Lodgepole Pine, tend to be more compact.
    • Spread: Christmas trees also have wide root systems and can develop extensive foliage. Be sure to plant the tree far enough away from buildings, fences, and other plants to allow room for growth. Planting too close to houses can cause root systems to interfere with foundations and underground utilities.
    • Consider the wind: Christmas trees can be vulnerable to strong winds, particularly in exposed areas. It’s a good idea to plant your tree in a sheltered spot, such as near a hedge or fence, to protect it as it grows.

    4. Choosing Between a Potted or Bare Root Specimen

    When purchasing a Christmas tree for planting in your garden, you’ll likely have the option of choosing between a potted or bare root specimen. Each type has its benefits depending on your needs.

    • Bare Root Trees
      Bare root trees are typically available from November to March during the dormant season. These trees are more affordable and are usually offered in smaller sizes (20-30 cm tall). Bare root trees offer good value for money, but they do require more care during planting to ensure they are properly watered and established.
    • Potted Trees
      Potted Christmas trees are a better option if you are looking for a more mature tree on day one. They are typically sold with a larger root system, allowing for faster establishment in the garden. Potted trees are often available throughout the year, and they can be planted at any time as long as the soil is not frozen or waterlogged. These trees can be more expensive, but they give you an immediate, more established presence in your garden.

     5. Preparing the Planting Hole

    Once you’ve selected your tree and chosen the right planting location, it’s time to prepare the planting hole. Proper hole preparation ensures that your tree will root properly and grow to its full potential.

    • Digging the Hole: Dig a hole that is approximately twice the width and the same depth as the tree’s root ball. This will give the tree room to spread out its roots and help it settle into the surrounding soil.
    • Breaking Up the Soil: To encourage the roots to expand into the surrounding soil, break up the soil around the edges of the hole using a fork. This will allow the roots to grow more freely and help prevent any root circling or constriction.
    • Improving Drainage: If the soil in your garden is heavy clay or poorly drained, mix in some grit or sharp sand when backfilling the hole. This will improve drainage and reduce the risk of root rot.
    • Adding Compost: Incorporating some well-rotted garden compost into the backfill mixture will provide the young tree with some additional nutrients to support its initial growth.

    6. Mulching

    Mulching around the base of your Christmas tree after planting helps retain moisture, suppress weeds, and regulate soil temperature. It’s an essential part of tree care, particularly during the first few years when the tree is establishing itself.

    • Type of Mulch: Bark chippings are an excellent option for mulching around Christmas trees. They are readily available and break down slowly, adding organic matter to the soil over time. Avoid using grass clippings or other materials that may decompose too quickly and become slimy or compacted.
    • How Much Mulch: Apply a 5-10 cm layer of mulch around the base of the tree, extending it out to the edge of the root zone. Be sure to leave a gap around the trunk to prevent moisture from accumulating against the tree’s bark, which can lead to rot.

    7. Care After Planting

    Once your Christmas tree is planted, proper care will ensure it establishes a strong root system and thrives over time. The most important aspects of care during the first few years are watering, mulching, and monitoring for pests.

    • Watering: Water the tree thoroughly after planting and continue to water regularly during the first year, especially in dry periods. Young trees are particularly sensitive to drought, and keeping the soil moist will help them establish healthy roots. Watering should be done from spring through autumn in the first season.
    • Drought Tolerance: Once your tree is well-established, it will become more drought-tolerant. After the first few years, Christmas trees require less frequent watering, but it’s still important to keep an eye on them during particularly dry spells.
    • Pest and Disease Monitoring: Keep an eye out for pests such as aphids, spider mites, and aphid larvae, which can affect young trees. Regularly check for signs of diseases, such as needle browning or yellowing. Pruning any dead or damaged branches will help keep the tree healthy.

    By carefully selecting the right Christmas tree variety, planting it in the right conditions, and providing ongoing care, you can grow a beautiful real Christmas tree that will become a cherished part of your garden for years to come. Happy planting!

  • 6 Best Ferns to Use As Border Plants

    6 Best Ferns to Use As Border Plants

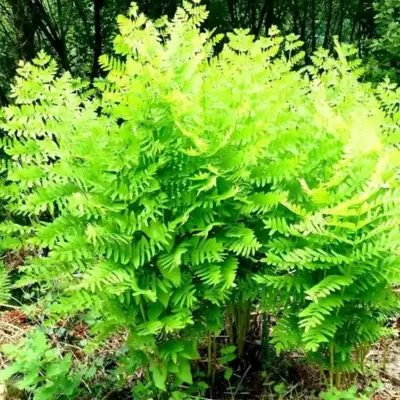
    Top 6 Ferns for Beautiful Borders: Adding Lush Greenery and Texture Ferns are a classic addition to any garden landscape, particularly along borders where they can add a sense of lushness, depth, and delicate texture. Among the few species of plants that don’t flower are ferns. They reproduce using spores, which are found underneath their leaves. They range in size from a few inches to six feet and are available in different shades of green. Their elegant fronds and varying shades of green bring a touch of the wild to even the most meticulously tended gardens. With so many fern varieties, choosing the right ones for your borders can be overwhelming. Let’s explore six top fern choices that are both visually stunning and relatively easy to incorporate into your garden borders, along with tips from TN Nursery on how to care for them:

    1. New York Fern (Thelypteris noveboracensis)

    The New York fern is a deciduous plant thrives in moist, shaded areas. Its delicate, light green fronds have a distinctive shape and grow clumping, making it an excellent choice for filling gaps along borders. It displays a beautiful yellow hue in the fall before returning for winter. Their airy, delicate appearance adds a sense of lightness and movement to borders and arrangements, creating a dynamic visual contrast.

    • Hardiness Zones: 3-8
    • Light: Partial to full shade
    • Soil: Moist, well-drained
    • Height: 1-2 feet
    • Spread: 1-2 feet 2.

    2. Christmas Fern (Polystichum acrostichoides)


    The Christmas fern is a timeless classic for its evergreen nature. Its glossy, dark green fronds add year-round interest to borders. It has shiny, leathery fronds that emerge in a distinctive shuttlecock pattern, gradually unfolding into a graceful vase-like shape. This fern gets its name from its ability to retain its foliage throughout winter, resembling miniature Christmas trees. You can add lasting color with this low-maintenance option. Their deep green hue provides a striking backdrop for seasonal blooms and adds year-round interest to garden borders.

    • Hardiness Zones: 3-9
    • Light: Partial to full shade
    • Soil: Moist, well-drained, slightly acidic
    • Height: 1-2 feet
    • Spread: 1-2 feet 3.

    3. Hay-Scented Fern (Dennstaedtia punctilobula)

    The hay-scented fern is unique for its sweet fragrance. His native North American species produces dense colonies of finely textured fronds, creating a lush carpet-like effect in garden borders it releases when its fronds are crushed. This ground cover spreads rapidly with delicate, lacy fronds, making it an excellent choice for covering large areas quickly. Just be mindful of planting it where it can apply without taking over. The airy foliage of these plants adds whimsy to border plantings and complements a wide range of companion plants.

    • Hardiness Zones: 3-8
    • Light: Partial to full shade
    • Soil: Moist, well-drained
    • Height: 1-3 feet
    • Spread: Can spread indefinitely

    4. Lady Fern (Athyrium filix-femina)

    The lady fern is beloved for its graceful, arching fronds and vibrant green color. It’s a versatile option that adapts to various light and soil conditions. Several cultivars of lady fern include the elegant ‘Victoriae’ with its crisscrossing fronds and the silvery-purple Japanese-painted fern. It is valued for softening hard edges and creating a sense of gentle movement in garden borders.

    • Hardiness Zones: 4-8
    • Light: Partial to full shade
    • Soil: Moist, well-drained
    • Height: 1-3 feet
    • Spread: 1-2 feet

    5. Ostrich Fern (Matteuccia struthiopteris)

    The ostrich fern is spectacular with its large, vase-shaped fronds that resemble ostrich plumes. Native to North America, Europe, and Asia, this vigorous species forms large, vase-shaped clumps that add vertical interest to garden landscapes. It makes a striking statement in any border as one of the tallest fern species. It prefers moist environments and spreads quickly, making it an excellent choice for larger spaces. Their dramatic form and vibrant green foliage create a focal point in any planting scheme, whether used as standalone specimens or combined with other shade-loving perennials

    . • Hardiness Zones: 3-7

    • Light: Partial to full shade
    • Soil: Moist, well-drained
    • Height: 3-6 feet
    • Spread: 2-4 feet

    6. Royal Fern (Osmunda regalis)

    Undoubtedly, the Royal Fern (Osmunda regalis) is one of the most magnificent and regal plants on the planet. This plant has long, arching fronds that reach a length of six feet and are a deep green color. Royal ferns prefer acidic, damp soil in partially to wholly shaded areas. In the fall, the Royal Fern’s fronds can turn a brilliant golden-brown hue, enhancing your landscape’s visual appeal. There is no need to routinely water the Royal Fern since it loves consistently moist soil.

    Spring fertilization with balanced, slow-release fertilizers can make a world of difference. Dead fronds should also be removed in the spring. Royal Ferns are an excellent option for dramatic statements in your garden or landscape.

     Tips for Growing Ferns in Borders

    • Provide Shade: Most ferns prefer partial to full shade; check the preferences of your chosen varieties.
    • Rich, Moist Soil: Ferns thrive in well-drained soil rich in organic matter.
    • Mulch: Maintain soil moisture and suppress weeds with a layer of mulch.
    • Watering: Water regularly, especially during dry periods.
    • Division: Divide overgrown ferns every few years to maintain their shape and vigor.

    The Timeless Beauty of Ferns:

    You can plant many ferns on your border, some of which are perennial and some of which are evergreen. Combining your ferns with other shade-loving plants will also create a stunning effect. With their diverse textures, colors, and forms, these ferns create attractive, low-maintenance garden borders. Their tolerance for shade is an invaluable asset for creating lush oases in often overlooked areas of your landscape. These fern species provide enduring beauty and low-maintenance appeal for gardeners seeking to create stunning borders that delight the senses throughout the year, whether used as focal points, accents, or ground covers.

    Final Remarks:

    By incorporating these exceptional ferns into your borders, you can elevate your garden with their timeless beauty, diverse textures, and captivating colors. These hardy native ferns will elevate your gardening game! These ferns can flourish and remain impressive for many years if you follow their straightforward care instructions. Instead of opting for a dull garden, how about a fern-tactic one? Get started with your planting today! Let me know if you’d like additional fern varieties or a more focused discussion on planting and care. Happy Gardening!

  • Unmasking Common Garden Pests and Their Impact on Your Blooms

    Unmasking Common Garden Pests and Their Impact on Your Blooms

    Gardens are peaceful refuges where nature’s beauty shines. Unfortunately, horticultural pests often invade this peaceful scene. These little pests can destroy your well-kept plants. Every gardener must understand the common causes and effects of these attacks. This article reveals some typical garden pests and discusses control.

    The stealthy invaders and their tactics

    Understanding the enemy is key to pest control. Aphids are infamous horticultural pests that damage plants by sucking sap. Caterpillars and snails also damage leaves. Uncontrolled bug populations can affect the ecosystem, even though they are natural. Professionals like those at Top Line Pest Control is crucial here. They protect your garden sustainably and eco-friendly with their pest management skills.

    The impact on plant health and growth

    These pests have a major negative impact on the health and appearance of your garden. For example, aphids reduce the amount of fluids in plants and spread illness, which weakens the plants’ health and yield. Slugs and caterpillars can cause holes in leaves that hinder growth and blossoming, severely detracting from the garden’s aesthetic appeal. Stress causes physical harm and increases susceptibility to diseases, creating a vicious cycle of fragility and vulnerability in plants. This stress exacerbates the issue by weakening the plants and decreasing their resistance to subsequent pest attacks.

    Integrated pest management: A sustainable approach

    Dealing with garden pests doesn’t always require chemical sprays. Integrated Pest Management (IPM) uses biological management, pest-resistant plant cultivars, and appropriate gardening techniques to control pests sustainably. Responsible firms like Top Line Pest Control use this method to control pests and reduce environmental effects.

    Biological control: Nature’s pest management

    Biological control is an effective IPM approach. This involves controlling pest populations using natural predators or parasites. Ladybugs are great at controlling aphids. These natural companions help suppress pests and balance the garden’s ecosystem.

    Cultural practices to prevent pest infestations

    Cultural norms are essential for managing pests. Eliminating debris from your garden reduces the number of places where insects can hide, making the atmosphere less favourable for pest growth. Rotating your crops and choosing plants resistant to pests will lessen the occurrence of severe infestations and increase your garden’s general resilience. Frequent garden monitoring ensures timely action before infestations become severe by assisting in the early identification of pests for effective control. This proactive approach is essential to keeping a thriving and healthy garden.

    Chemical control: A last resort

    Chemical control is a quick cure but should be used last owing to its environmental and non-target effects. Use it sparingly and with other IPM methods. Top Line Pest Control knows this balance is important and initially uses the least hazardous solutions.

    The role of professional pest control services

    Pest infestations can overwhelm even the best attempts. Professionals like Top Line Pest Control can help. Their skills and experience allow them to give focused, effective remedies that minimize garden ecological damage.

    Conclusion

    Garden pests are part of the ecology but can become problems if not managed. Effective pest management begins with understanding pest species and impacts. Intelligent pest management—biological control, cultural methods, and chemical use—can keep a garden healthy. Professional services help maintain your garden’s delicate environment when needed. With proper care, your flowers can grow without common garden pests.

  • Alternative Ways to Start Low Maintenance Gardening in a Rental

    Alternative Ways to Start Low Maintenance Gardening in a Rental

    Many believe owning rental property is a simple way to make money. However, any landlord understands how much time and money goes into advertising, filling, and maintaining a rental property.  Aside from keeping the property desirable and functional, a property owner or management must follow laws and pay taxes. And, if the rental agreement includes extras like garden maintenance, providing those takes time, money, or both.

    When it comes to gardening, landlords and tenants frequently disagree on what is and is not permitted on the rental property. While tenants may desire to set up a garden and reap the benefits, such as growing their own food and making the space more homelike, landlords may object. Landlords are primarily concerned with preserving their investment, including a garden, from damage and changes.

    Low-maintenance landscaping should be a priority, whether you do it yourself, hire a landscaping or yard maintenance company, or your rental leasing agreement requires your tenants to care for the garden. Whether you have a balcony, windowsill, or a small patch of soil, these alternative methods will empower you to cultivate a beautiful garden, effortlessly enhancing your rental living space.

    Should Landlords Allow Plants in Their Rental?

    Allowing plants in rental properties can be a win-win situation for landlords and tenants. Greenery improves the property’s aesthetic appeal, potentially attracting more renters and creating a positive living environment. Indoor plants have been shown to improve air quality and produce a tranquil environment, which can increase tenant satisfaction.

    However, there may be concerns about potential plant damage or neglect. Landlords could establish guidelines such as limiting the number and size of plants or clarifying who is responsible for their care. Clear communication and collaboration between landlords and tenants may foster a mutually beneficial approach to incorporating plants into rental property.

    Allowing plants in rentals ultimately demonstrates a progressive mindset that values well-being and environmental consciousness. Property owners can encourage a peaceful coexistence of nature and living spaces within their rental properties by balancing aesthetics and practicality.

    Establishing Tenant’s Tenancy Agreement

    1.  Creating Agreeable Terms

    Creating a lease agreement for a tenant entails specifying terms that enable an excellent landlord-tenant relationship. You should provide specific rent details, such as the amount, due date, and acceptable payment methods. Also, outline maintenance obligations, clarifying if the tenant or landlord is responsible for specific activities. Bay Property Management Group Northern Virginia offers a comprehensive rental agreement.

    Clearly state the lease’s duration and renewal requirements. Include provisions for security deposits that specify the amount and terms of return. If applicable, specify rules for subletting and create guidelines for appropriate conduct on the property. Make sure that all parties are aware of any penalties or consequences for breaching the agreement. A clear and agreeable lease agreement is the foundation for a positive and mutually respectful living arrangement.

    2.  Landscaping Changes as Violations

    To minimize any violations, it’s critical to establish guidelines regarding landscape changes in a tenant’s leasing agreement. Declare explicitly that significant changes to the landscaping, such as removing or planting trees, modifying existing gardens, or altering outside structures without prior consent, are violations.

    Specify the approval process, ensuring tenants communicate proposed changes in writing before implementation. Outline the consequences of unauthorized landscape changes, including penalties or restoration fees. This proactive approach maintains the property’s aesthetics and creates a transparent framework for tenant-landlord cooperation, encouraging a peaceful living environment.

    Top 3 Alternative Ways to Start Low-Maintenance Gardening

    1.  Container Garden

    Container gardens are exactly what they sound like: fruits and vegetables cultivated in huge containers. Flowers and food can be housed in various containers such as tubs, pots, barrels, and more. Container gardening is ideal for a small yard, balcony, or rental property, as it is never permanent but can satisfy a tenant’s desire for a garden.

    Allow containers along the sunny side of the yard along the fence, or agree to put a window box or hanging basket with the tenant. Container plants, in the right arrangement, can improve the property’s curb appeal and satisfy your tenant without requiring too many permanent improvements.

    2.  Flower Bed Garden

    Consider allowing the tenant to use flower beds near the property or in the yard as a garden if the rental property has them. Because they are already part of the landscape, it doesn’t require much work for the tenant to prepare the ground for planting. Even if you currently have flowers or bushes there, you could allow the tenant to utilize the space in between, or you could postpone planting flowers to provide the tenant with that space.

    However, it’s not difficult to reclaim that space for flowers once the tenant has left. If you don’t want to dedicate all of your flowerbed space to a tenant’s garden, try allocating at least a little space.

    3.  Vertical Gardening

    Vertical gardening is a top low-maintenance alternative, providing a space-efficient and visually appealing method. Install wall-mounted planters, vertical garden towers, or hanging pots to use vertical space. These arrangements maximize space and simplify maintenance by making watering and upkeep more accessible.

    Choose low-maintenance plants that grow in vertical environments, such as succulents, herbs, or hardy perennials. Vertical gardening offers a decorative touch and allows renters to enjoy a green oasis without wasting valuable floor space. Embrace the vertical dimension and watch your low-maintenance landscape flourish in flair and simplicity.

    Final Thoughts

    Embracing low-maintenance gardening in a rental home opens up a world of possibilities for nature lovers and those with busy lifestyles. Renters can nurture green havens without compromising flexibility by exploring options such as container gardening, vertical gardening, and flower beds. These methods reduce the impact on the property and create a connection with nature.

    Drought-resistant plants, self-watering systems, and strategic placement of garden elements promote long-term sustainability and ease of care. Finally, the journey into low-maintenance gardening turns a temporary living area into a flourishing, personalized space that fits the rhythm of modern, on-the-go lifestyles.

  • How to Grow Asters

    How to Grow Asters

    Asters thrive under ideal conditions and bloom easily with minimal care required, making them one of the easiest flowers to maintain and resistant to diseases and pests.

    Plant asters in spring, keeping their soil moist but not saturated. Mulching will help retain moisture and control weeds; additionally, divide clumps every couple years for improved health and to promote more blooms.

    Location

    Asters make a lovely addition to garden beds and containers with their daisy-like flowers and easy care requirements, making them perfect for fall blooming bloomers in zones 3 through 9. These fall bloomers range from 1 foot tall up to 6 feet tall and hardiness is tested from 3 through 9 when grown outdoors. In garden beds, shorter varieties serve as filler plants until late summer/autumn bloomers such as black-eyed Susans, zinnias or coneflowers have finished flowering production. Taller varieties provide great backdrops or interplant them with other blooming perennials like black-eyed Susans, Zinnias or coneflowers if interplanted among perennial bloomers such as black-eyed Susans or coneflowers when interplanted among blooming perennials such as black-eyed Susans/zinnias/coneflowers when other perennials have stopped producing flower production while short varieties make great filler plants until late summer/august when other perennials have stopped flowering; taller varieties make great backdrop plants as backdrop or can even interplanted among perennial bloomers like black-eyed Susans/zinnias/coneflowers/coneflowers/ coneflowers/coneflowers/coneflowers etc…

    Asters seedlings can be planted indoors in early spring or outdoors after all risk of frost has passed, either directly in your garden or transplanted later that season. When starting from seeds, ensure they receive full sunlight with rich, well-draining soil to germinate. Once planted in their new environments, asters tend to thrive when placed partially shaded areas that get plenty of light – in Northern climates it’s best to do this early autumn in order to give the plants time to settle before winter arrives!

    When planting asters from containers, select a pot that’s at least as wide and half as deep as its eventual width and depth – this will help create a balanced look between plant and pot. Asters prefer moderately rich, loamy soil that drains well; when amending this material use compost for nutrients. Avoid sandy soils that drain too rapidly because this may stress out asters. When watering them instead ensure it reaches their roots rather than leaves and flowers to prevent powdery mildew forming on leaves or flowers which could promote powdery mildew development.

    As soon as flowers start to fade, cut back asters to just above ground level to encourage rebloom and help avoid disease. Once frost has subsided, use organic materials for mulching at their base in order to retain moisture and protect from harsh winter weather conditions. You may also light fertilize growing asters with balanced plant food once every month for additional benefits.

    Soil

    Asters thrive in most garden soils, but for optimal results it is best to plant them in loose, loamy, well-draining soil. For best results, plant late spring or fall so their strong root system can establish itself before hot weather or harsh winter conditions arrive. They also do well when grown in containers as long as their roots have room to expand. In heavy soil that requires amendment with more organic matter adding coconut coir or perlite can often help improve drainage and nutrient availability.

    Once asters are established in your garden, they require minimal care to stay healthy. Aside from regular watering and mulching, asters benefit from receiving light applications of balanced fertilizer in spring and summer as well as pinch back flower stems early summer to encourage bushier, less leggy growth with more lateral stems for additional blooms. Tall varieties may need staking midsummer; once blooming season ends in fall you can either cut them down or leave their seed heads up for wildlife feeding purposes.

    Propagating asters via division and cuttings is generally straightforward and results in reliable seedlings. Self-sowing may also yield results, although any seedlings produced may not resemble their parent plants and could prove weaker.

    Divesting an aster clump should be performed early in spring as soon as new growth has appeared. Dig up and divide up all root clumps using either hand or spade, discarding any woody or nonproductive portions before replanting immediately or taking softwood cuttings from healthy plants between April and August to increase stock.

    Water

    Asters continue blooming well into fall when many other perennials and annuals have gone dormant, making them perfect for landscape use with other fall-blooming flowers, planting in containers for an eye-catching autumn display, cutting for arrangements or simply keeping around as cuts. Being easy to grow, asters make great choices for new gardeners looking for low maintenance solutions without insect or disease issues – although after several years’ growth the aster plants should be divided to maintain health and prevent overcrowding.

    Soil that is both rich and loamy is ideal for growing asters, with plenty of organic matter such as compost or manure to promote drainage and provide essential nutrients for plant health. When using commercially prepared potting mixes, consider substituting coconut coir or perlite with some of the regular material to improve drainage and aeration.

    Aster seeds should be planted indoors at least four weeks prior to their expected last frost date in biodegradable seed starter cells filled with good-quality potting medium, barely covering each seed with soil and placing in an indirect sunlight location. Once seedlings appear, thin to one seedling per cell.

    Once the asters have been planted in your garden, space them 1 to 3 feet apart depending on their species and anticipated size. Mulching will help keep soil cool while also helping prevent weeds from popping up; make sure you provide ample irrigation after planting as well as regularly throughout summertime.

    Fertilization

    Asters do not need heavy fertilization, but will bloom more reliably with regular applications of slow-release all-purpose or flowering-specific fertilizer in spring and summer. Make sure not to overfertilize, as overfertilization could stop flowering altogether.

    Mulching is also essential for asters, as it helps preserve moisture levels in the soil and regulate temperature. A layer of organic material such as leaves, straw or wood chips should cover at least 2 inches deep of soil surface in order to keep soil cool and prevent weed growth around their flowers.

    If you can’t wait until fall to plant asters, many nurseries offer a selection in spring. Or you can grow them from seeds or root cuttings. When sowing indoors in late winter or early spring for optimal results; transfer seedlings outdoors when the weather warms up for planting outdoors when ready. When transplanting young asters from nursery containers into your garden spaced 1- 3 feet apart.

    If growing from cuttings, begin taking stem tips in spring and removing all leaves except those at the bottom half of each stem. Dip these ends in rooting hormone, and plant them in multipurpose compost in planting holes slightly deeper than where the cuttings came out of. Keep the containers out of direct sunlight but in bright areas with indirect lighting; water regularly until your cuttings root before overwintering them in greenhouse or cold frame until ready to transplant them outdoors gradually acclimating seedlings to outdoor conditions over several days before taking their final placement outdoors.

    Pruning

    Asters thrive when provided the appropriate conditions. Full sun conditions are best, although partial shade (such as from trees) is acceptable for certain varieties like wood asters. They require well-drained soil; boggy conditions may lead to root rot while dry sandy soil hinders growth and delays flowering. When planting them in their new homes, incorporate compost or well-rotted manure before adding your asters for best results. Mulching helps retain moisture levels and regulate temperatures within their growing space.

    Aster plants can be propagated from seed, but this process may take too long and result in plants that don’t look exactly like the parent plant. Therefore, division or cutting propagation may be more suitable.

    Once a plant has outgrown its space, dividing can help create two separate aster plants. Furthermore, it’s beneficial to divide asters every three years in order to maintain vigor and avoid leggy growth.

    Aster plants require regular pruning in order to stay in shape, remove dead stems and promote reblooming. Pruning can help top-heavy plants become bushier; for those that become top heavy, cut back the tallest stems by one-third to encourage bushiness. Asters also benefit from light spring pruning of leaves and flowers to promote reblooming.

    Asters can be vulnerable to leaf spot and stem canker, with infected leaves and flowers needing to be removed immediately to stop its spread. You can help combat these problems by mulching and watering properly, eliminating any weeds near your asters, and using an organic fertilizer in fall after all of their leaves have fallen from them.

  • How to Start a Back to Eden Garden

    How to Start a Back to Eden Garden

    Back to Eden gardening has gained widespread attention from a documentary film that showcased Paul Gautschi’s revolutionary gardening method, inspired by woodland environments where leaves, twigs and branches form dense layers that become rich soil without human interference! Back to Eden is an approach similar to this that takes its inspiration from woodland environments where dense layers of leaves, twigs and branches cover densely packed soil – eventually providing abundantly fertile ground that doesn’t require human labor!

    1. Choose Your Location

    Back to Eden gardening is an easy and natural way of growing vegetables, fruits and herbs in small gardens or large farms alike. Requiring minimal space and no tilling for growth, Back to Eden gardening works perfectly as a natural alternative for those wanting to reduce chemical fertilizer use.

    Step one of creating a Back to Eden garden is preparing the area and gathering materials. Soil doesn’t need to be cleared or tilled, just free from weeds. Additionally, loose soil should allow adequate drainage.

    At first, lay down a layer of newspaper or light cardboard to prevent weeds from sprouting and is easily removable once plants have become established. Next, add compost; this could be homemade mushroom compost, store-bought compost or anything that suits your garden size; the amount needed will depend on its size but aim for three to four inches deep layer for best results.

    Add a layer of wood chips from different trees – such as maples and oaks – as this will provide your soil with additional nutrition. Eucalyptus wood chips should be avoided since their oil can impede plant growth. Over time, these will eventually decompose and become rich compost for your garden.

    As chips and leaves decompose, they provide vital nutrients for your plants while simultaneously controlling weeds. Furthermore, using mulch will prevent water from splashing onto them during rain or watering sessions, potentially spreading fungal diseases to them.

    Back to Eden gardens may still need some weeding, although much less so than bare ground. Weeds will likely appear less frequently and be easier to manage once they appear.

    No matter your reservations about Back to Eden gardening methods, they remain an effective method. Many have discovered it as an efficient means of producing food while offering an alternative to chemical solutions.

    2. Get Your Materials Ready

    Back to Eden is a gardening method popularized by Paul Gautschi, an arborist and devout Christian. His Back to Eden gardening technique draws on his belief that Eden was an abundant and self-sustenance garden; therefore he devised this no-till method that uses layers of wood chips to feed soil while simultaneously keeping out weeds from sprouting up – all for just $20 with amazing results!

    Before beginning to establish a Back to Eden garden, it’s essential that all necessary materials are available. Newspaper or plain cardboard makes for an effective first layer of mulch; layer five to six sheets deeply over an overlapping space until there are no gaps left between sheets; this allows weeds and grasses to pass through more easily so make sure you apply an herbicide first before moving on with covering layers of material.

    The second layer should consist of a generous spread of compost. Whether homemade or store-bought organic compost is appropriate; just be sure that it sits and breaks down for several months prior to applying it to your garden; this will help ensure you don’t add too much nitrogen that could burn plants in your plot.

    Once the compost has been applied, layer a layer of wood chips over it. As this layer will form the backbone of your Back to Eden garden, be sure to only use high-quality chips that have fully decomposed; any that contain cedar or treated wood should also be avoided.

    Mulch will help keep weeds down while providing extra moisture for your plants, thus decreasing watering needs. But this doesn’t mean you won’t ever need to water again; depending on weather and rainfall patterns, additional irrigation may still be required from time to time.

    One of the greatest misconceptions of Back to Eden gardens is that they don’t require fertilizing. While they do help prevent weeds, this natural mulch will still leach nutrients out of the soil over time; therefore it is vitally important to conduct a soil test to ascertain if your plants need additional manmade fertilizers.

    3. Start Layering

    Starting a Back to Eden garden requires clearing an area of the ground and removing anything that will hinder its creation. You do not have to completely clear or till your soil as layers will cover any imperfections such as grass clumps or rocks in it.

    Next, lay a layer of newspaper or light cardboard down. This will prevent any weeds from taking hold in your new garden bed while adding nutrients-rich mulch into the mix.

    Once the paper or light cardboard has been laid down, cover it with wood chips or another type of mulch to help keep weeds at bay while providing your plants with much-needed carbon rich soil nutrients. Furthermore, mulch provides soil protection from sun and wind exposure thereby helping maintain moisture balance within your garden.

    If you plan on using raw wood chips as part of your garden ecosystem, it is wise to let them sit over the winter so that they can begin decomposition in preparation for spring/summer fertilization with organic manure. Doing this will reduce work later.

    Many people worry that wood chips will bind up nitrogen in the soil. When used correctly, however, wood chips will actually release this nitrogen back into the environment as they break down, providing it to plants in your garden and making more available than before.

    Concerns have been expressed that the Back to Eden method will not work effectively in cold climates. Paul Gautschi details in his book how his orchard has not needed watering in 17 years; furthermore, Paul Gautschi conducted soil tests that demonstrated his trees are receiving all their essential nutrients naturally without commercial fertilizers or pesticides being applied; in fact, their garden’s soil had even more micronutrients than any of its neighbors’ gardens!

    4. Start Planting

    Back to Eden gardening method follows nature. In a forest, fallen branches land on the ground and decompose, producing carbon layers which build rich, fertile soil that brims with life. No one tills this land yet it produces abundant nourishment that supports life!

    Back to Eden seeks to resemble this process by applying mulch layers directly on top of soil surface. Instead of tilling soil directly, this approach uses organic material layers as layers of natural compost that enrich and loosen it gradually without actually touching it directly – something known as sheet composting – which works wonderfully when done right. When adding materials for sheet composting it is key that enough airflow, light, and space for microbes within soil survive without too much acidic material in your mulch, which could compromise them over time.

    Once your sheet compost has become established in your garden, it’s time to plant crops. The mulch will help control weeds while supporting plant growth; plus it reduces rain- and watering-induced splashback which spreads fungal diseases; it retains moisture in the soil so frequent watering needs will decrease due to less frequent irrigation needs.

    Many gardeners who utilize this approach find they need less watering, and their plants appear healthier than in traditional gardens. Furthermore, fertilizing requirements decrease significantly since organic material in mulch holds many of the essential nutrients required for plant growth.

    Some individuals have discovered that Back to Eden gardening doesn’t work for them due to a lack of understanding. Perhaps they are using materials which won’t break down as planned or are neglecting to give the soil enough time for recuperation and enrichment.

    If you’re curious to give this method a try, there are numerous resources online to assist with starting. Wood chip suppliers and recycling centers may supply free or inexpensive mulch; compost companies or farm manures are other resources which may also supply free or inexpensive mulch options.

  • What is the Best Way to Store Garlic?

    What is the Best Way to Store Garlic?

    Unpeeled heads of garlic have the unique ability to remain edible for six months when properly stored if kept cool and dark conditions. This is because garlic grows best under these circumstances.

    Avoid airtight containers that trap moisture as this causes garlic to rot more quickly, instead opt for more breathable containers like mesh bags or wire baskets.

    Keep it in the fridge

    Garlic is an indispensable ingredient, adding depth and spice to many dishes. Proper storage of garlic is critical in prolonging its shelf life; improper handling could quickly turn it rancid, losing both its pungent aroma and flavor. There are various methods available for extending its lifespan while maintaining quality: you could store it on the counter, in the fridge or even frozen; each method offers different advantages depending on the type and stage of garlic being stored.

    Store fresh garlic at room temperature is generally not recommended as this can encourage bacterial growth and shorten its shelf life. By adding an acidifying agent such as vinegar or lemon juice to the storage container, such as lowering its pH level and creating an inhospitable environment for bacteria growth, an acidifying agent may help mitigate this problem and extend shelf life (1).

    Store whole, unpeeled garlic in a cool, dark environment with minimal humidity for maximum longevity. A closet or spare cupboard that offers ventilation would likely do, though make sure the container used to house it is thoroughly sanitized before adding your garlic. Plastic bags tend to trap moisture and encourage mold growth; opt for something like a jar or mesh produce bag instead for best results.

    Refrigerating peeled or chopped garlic can also extend its shelf life, provided you sterilize your storage container first before filling it with enough oil to completely cover it. Be sure to use high-quality, flavorless oil that won’t alter its taste if possible.

    Once the garlic has been added to a jar, seal and store in the refrigerator immediately. Labelling with its date helps you track how long its been stored for. Alternatively, frozen chopped or peeled garlic extends its shelf life even further.

    Keep it in the pantry

    Garlic is an indispensable ingredient in the kitchen, adding depth of flavor to soups, sauces, marinades, hearty meat dishes and garlic bread dishes alike. Additionally, its super-savory aroma also lends itself perfectly for seasoning vegetables, rice or pasta dishes as well.

    Whole bulbs of garlic should be stored in cool, dark and well-ventilated conditions with less than 60% humidity ideally between 60 to 65 degrees F and no direct sunlight exposure as this could cause sprouting and dry out of their bulbs.

    First step to successfully storing garlic in the pantry is selecting an ideal storage container – mesh bag or woven basket are good choices, as they allow air circulation while protecting bulbs from touching. Avoid plastic bags and cling wrap as these will trap moisture, leading to spoilage of garlic bulbs.

    If you grow your own garlic or purchased some from the farmers’ market, it’s a wise move to sterilize the container you plan on using for long-term storage. Wash thoroughly with hot, soapy water before boiling or running through a dishwasher cycle for sanitation.

    Once your container has been sterilized, place your garlic bulbs inside. Be careful not to overcrowd, as this could hasten spoilage of bulbs. Also ensure the lid or top of your container is airtight to maintain an optimal environment for growth.

    Proper garlic storage will not only prevent it from spoiling but will also preserve its nutritional value and maintain its medicinal qualities. Garlic offers many health advantages and can help lower blood pressure, enhance cholesterol levels, alleviate cold symptoms, cleanse livers, help with arthritis symptoms and more.

    Keep it in the freezer

    Garlic is an amazing ingredient that adds an intense punch of flavor to almost any dish, whether cooking at home or using it in your garden. However, proper storage of garlic is essential if it is to retain its freshness and pungency for maximum effectiveness – there are various easy methods available to you that can keep garlic fresh and tasty!

    A whole head of garlic can last several months when stored properly. The ideal temperature and environment is room temperature, where its bulbs remain dry and crisp. Store your head of garlic somewhere cool and dark with sufficient ventilation – such as your closet or basement – however a paper bag or covered basket are also suitable storage methods.

    To extend the life of bulbs, first cut away any sprouts and stem tips to help prevent rot and mildew growth. Next, cover their heads in plastic or paper towel before placing in a dark, cool location out of direct sunlight – for optimal results invest in a root cellar but this option usually is not accessible.

    If you have excess garlic, freezing can extend its shelf life and lengthen its shelf life up to six months. Just be sure to store it in freezer safe containers; freezer burn can damage flavor and texture of garlic so airtight plastic bags or jars may leak or absorb odors during storage.

    If space is at a premium, chopping garlic and freezing it in an ice cube tray for future use may be easier. Just ensure the cubes are double or triple bagged to prevent leakage or absorb any of their garlicky scent. Using small silicone ice cube trays makes the process faster; just remember to label each bag accordingly with its contents and date.

    Keep it in a jar

    Garlic can be stored in oil to prolong its flavor for months. For best results, the container should first be sterilized, using neutral-flavored vegetable oils like olive oil as the medium for storage. After adding garlic to the jar, make sure its lid remains secure as escaping air could make spoilage even faster than expected. Additionally, store it in the fridge to reduce bacteria growth that would otherwise occur at room temperature; additionally it’s wise to avoid keeping garlic near food or ingredients which emit strong smells as this could transfer their scent over and make spoilage speed up quickly!

    To extend the shelf life of garlic, select fresh bulbs with firm cloves and tight skins. Store your bulbs in a cool, dark area until ready for use – whole bulbs can be stored in the pantry while peeled and sliced garlic should be placed in the fridge if available; alternatively a cool, dark cupboard would suffice.

    Temperature, humidity and ventilation all play an integral part in determining how long garlic can stay fresh for use. Too much moisture may cause it to mold or rot while dry conditions lead to shrinkage and flavor loss.

    Root cellars were once considered ideal storage space for large quantities of garlic. While not every household can take advantage of such facilities today, if you do have access to one ideally temperatures should range between 60-65 degrees Fahrenheit with low humidity levels and plenty of airflow for optimal conditions.

    Garlic can also be frozen to extend its shelf life, though doing so takes more effort than simply tossing it in the freezer. For best results, use fresh and clean cloves that have not become soft and mushy before freezing individually on a baking sheet until solid before adding them to a bag for storage – this prevents sticking together during defrosting.

  • How to Ripen a Tomato

    How to Ripen a Tomato

    If your tomatoes aren’t ripening as quickly as desired, try these tips to speed things up. Remove any unhealthy or overripe fruits that could lead to further rotting among other tomatoes.

    Next, place the tomatoes together in a breathable container such as a cardboard produce box or paper bag and add an item such as an apple or banana to help diffuse ethylene gas released by tomatoes naturally.

    Temperature

    Tomatoes ripen best outdoors where temperatures range between 65 and 75 degrees F, but extreme hot or cold temperatures can slow or even stop this process. Protecting plants from temperature extremes can speed up ripening. Frost blankets or shade cloth can be wrapped around cages to shield them from sudden temperature drops while providing warmth during cool nights.

    Tomato plants require regular, yet moderate watering – no more than is necessary to prevent soil saturation. Too much water causes the plant to focus all its energy on root development rather than fruit development and ripening. On warm, calm days, give flower clusters a shake to increase pollination rates and the formation of larger fruits.

    Green tomatoes harvested while still in the green stage — 30-60% of its surface is light red — can be rapidly ripened indoors by placing them near other ripening tomatoes or bananas that release ethylene gas, helping unripe ones ripen quickly. Ripe bananas also absorb any moisture released by rotten ones to protect the other good ones.

    If you don’t have an ripening banana handy, placing tomatoes in a cardboard produce box will also speed up their ripening. Make sure the tomatoes don’t touch each other and place something absorbent like paper towel or folded cloth at the bottom of your container to absorb any extra moisture that accumulates; check often and remove any that show signs of rot from your container.

    An airtight plastic container will trap too much of the ethylene that tomatoes release and trap humidity causing your tomatoes to rot quickly. A cardboard box or paper bag with holes cut in it might be more suitable as some people have difficulties opening containers completely.

    Remember, indoor tomatoes will likely lack the full-bodied flavors found on vine-ripened ones; but as an easy and quick way of enjoying freshly grown, homegrown tomatoes, this method is very efficient.

    Humidity

    Humidity levels also play a significant role in ripening tomatoes successfully. Too dry of an air environment causes tomatoes to wither quickly and become unsuitable for consumption, while humidity levels between 65-70 degrees provide optimal ripening conditions.

    Tomato plants emit ethylene, a plant hormone which regulates their growth and stimulates their ripening by turning starch to sugar. Other climacteric fruits like bananas and apples also release this natural plant hormone when they ripen; to speed up unripe tomato ripening faster place them together in a paper bag with ripe bananas or apples as this will allow their ethylene gasses to diffuse into your tomatoes quickly allowing them to ripen faster.

    One of the easiest and fastest ways to ripen green tomatoes is to pick them and bring them indoors, where it can ripen more efficiently than on its vine. Doing so would save energy that could otherwise go toward developing flowers and fruits on your vine, plus use up nutrients needed for growing new fruit or even just maturing existing fruits, leading to smaller less flavorful tomatoes than could otherwise exist.

    To prevent picking an immature tomato too early, keep an eye out for signs of color change on its skin. A green tomato should ideally be picked at its Breakers stage when 30-60 percent of its surface begins showing signs of color change, before moving it on to Turning when 60-90% is showing some pink or red hue. Finally, it can reach Light Red or Red stage which indicates over 90% is red.

    An often-made mistake when it comes to ripening tomatoes is placing them in a refrigerator, where its chilling temperatures actually hinder or stop their progress. A garage or basement with temperatures over 50 degrees are better places for optimal ripening conditions; fan vents or automatic vents can be set up so as to release carbon dioxide continuously, thus preventing moisture accumulation which could potentially spoil them.

    Light

    Tomatoes require light for proper ripening, yet it is important not to overdo it. Prolonged exposure to direct sunlight may overheat them and interfere with pigment synthesis; overexposure also increases risk of uneven ripening or spoilage before becoming uniform red in color.

    Tomato plants emit an ethylene gas that increases as they ripen, so to speed up ripening, tomatoes that haven’t reached full maturity can be placed in a paper bag with bananas to increase their levels and speed ripening faster. Other fruits that could also work include apples, oranges or pears. Artificial chemicals may be used to fumigate tomatoes to accelerate this process but this might not always be suitable for home gardeners.

    If the tomatoes have not reached a stage where they can fully ripen on their vine, picking can begin when patches of yellow or orange start appearing. A green tomato with this trait ripens more rapidly and offers better flavour than one that remains fully green.

    To hasten tomato ripening, place them in a brown paper bag along with bananas or other fruit that produces high levels of ethylene gas. This method can speed up their development by several days or weeks.

    As part of helping tomatoes ripen more quickly, other measures include trimming away diseased or damaged leaves and pinching off flowers before they wilt – this will allow the plant to concentrate its efforts on ripening rather than expending resources on fighting diseases.

    On warm, calm days it can be beneficial to give flower clusters a gentle shake in order to facilitate pollination. Tomatoes that do not receive sufficient pollination will not ripen properly and eventually fall off their plant.

    Water

    Tomatoes require water for growth, yet too much or too little can inhibit the ripening process. Too much can keep tomatoes green without developing full flavor; too little will ripen but not produce full-flavored fruit. The optimal water temperature range for ripening tomatoes should be between 65-85 degrees Fahrenheit.

    If you have green tomatoes that haven’t ripened yet, try placing them in a paper bag or cardboard box with apples or bananas, which also produce ethylene gas to accelerate ripening processes. Doing this may speed up their progress more rapidly.

    Gardeners employ another tactic for speedy tomato fruit ripening by placing a bowl or pan on top of their tomato plants to provide them with an ideal microclimate and shield the fruits from being exposed to intense sunlight that could otherwise cause overheating and burn-related damages.

    Refrigerating tomatoes can also help hasten their ripening. Just ensure you take steps to detach them from their vine before placing them inside; this will stop their resource-using mother plant from contributing its resources towards ripening and allows the tomatoes to ripen more quickly once picked from its vine.

    Add salt to your water to hasten tomato ripening by decreasing their ability to uptake water, mimicking drought conditions and speeding up their ripening.

    Tomatoes can be tricky vegetables to work with when they’re unripe enough. By understanding which conditions will cause them to ripen more easily, creating delicious tomato dishes is easier than ever! Be sure to take pictures throughout the process so you have an record for next year! Enjoy!

  • How to Get Rid of Fungus on Plants

    How to Get Rid of Fungus on Plants

    Fungal diseases like mildew aren’t harmful and are usually treatable quickly – many even preventable!

    Antifungal treatments are accessible and within your kitchen pantry or bathroom cabinets. Vinegar can act as an excellent natural fungicide; use equal parts vinegar and water in a spray bottle and apply directly onto plants that need treating.

    Hydrogen Peroxide

    Hydrogen peroxide is an affordable and safe plant treatment available in most households, commonly used to kill fungus on plants as well as pests like insects. Furthermore, its usage is both affordable and simple. Hydrogen peroxide can be an effective tool in eliminating fungi on vegetables, fruits, herbs and flowers. It is particularly effective against powdery mildew – which appears as white dust on leaves and stems – found on almost all types of plants from pumpkins to lilacs. Mix 1 part hydrogen peroxide with 9 parts water in a spray bottle and apply to all affected areas of a plant, testing first on small sections first before using all-over spraying for best results. Make sure to test this solution on small spots first to make sure it won’t negatively impact it before applying over large sections of plant life.

    Hydrogen Peroxide can also be an effective tool in controlling fungus gnat infestation in your garden. It works by killing the gnats while decreasing soil acidity – both essential elements in avoiding future gnat infestation. You can either spray it onto infected plants directly, or pour it directly onto their soil to alleviate their infestation.

    Hydrogen peroxide can also be used to sterilize gardening tools and pots, helping prevent the spread of fungus or diseases throughout your garden. In such instances, however, care must be taken to allow all of the hydrogen peroxide to dry completely before using again.

    Hydrogen peroxide can be an invaluable asset when it comes to supporting plant growth. As an aerator, hydrogen peroxide mimics rainwater by providing oxygen and nutrients directly to roots of plants – be that directly onto the ground or mixed with water to make a soil drench solution.

    Water can also be used to priming seeds before planting them – known as seed priming – which speeds up their germination rates and protects them against fungal infections or any other organisms that might attempt to invade.

    Milk

    Milk can be an effective natural fungicide for plants. It works by altering the pH balance of plant leaf surfaces to make them less conducive for mildew spore growth; although researchers still aren’t entirely certain how this happens. Either way, milk works and is often more effective than chemical treatments when dealing with powdery mildew on vegetables like cucumbers, squash and cruciferous crops; simply spray on leaves at a ratio of one part milk to 10 parts water and apply liberally over leaves as necessary.

    Mild cases of powdery mildew will usually clear up on its own if conditions are conducive, but severe outbreaks can have devastating results in gardens. Powdery mildew appears as white to grayish spots on leaves that resemble dustings of flour; usually found on upper sides but also throughout plant. Severe infections may spread to affect flowers, buds or any tender new growth that sprouts as part of its pathogen attack.

    Powdery mildew thrives in humid conditions and spreads by wind-borne spores, often weakening healthy plants and decreasing yields. While not typically fatal to healthy plants, powdery mildew has proven especially problematic on cucumbers and squash plants as these species are susceptible to multiple varieties of the fungus.

    Preventing powdery mildew infections with regular milk treatments on plants is simple and effective, both as preventive measures and on existing diseased leaves. Milk treatments tend to work more effectively on older infections rather than young foliage.

    Make sure that you use the appropriate type of milk. Skim or whole milk is recommended, since full-fat varieties contain enzymes that promote fungal growth while their high acidic content may damage plants.

    Alongside milk, household items such as mouthwash and vinegar may also help combat fungus. It is best to alternate these home remedies every week in order to prevent resistant fungi from developing resistance and cause infections.

    Baking Soda

    Baking soda (sodium bicarbonate) has many uses in both the home and garden. It’s cost-effective, non-toxic to mammals, readily available at any grocery store and straightforward to apply – not to mention being an effective natural antifungal agent!

    Cornell Formula, an all-natural homemade remedy used to control fungal diseases in plants, is a favored home solution for managing these problems. Containing baking soda as one of its key components, this remedy offers gardeners who wish to forgoing harmful chemicals an option that keeps their gardens looking lush and green.

    The Cornell Formula is a simple combination of baking soda, water and vegetable oil that is effective against powdery mildew and black spot in tomatoes and other vegetables, as well as downy mildew, leaf spot and brown rot. Plus, its all-natural, non-toxic and cheap ingredients make it a great alternative to commercial fungicides!

    Note that, as with any homemade spray, the Cornell Formula should never be applied directly onto tomato plants during direct sunlight, as this could cause serious burns that kill their leaves. Before applying anything all-over the plant, always test any new mixtures on a small part first to avoid potential disaster.

    Home baking soda solutions can be quickly created at home by mixing one teaspoon of baking soda with one teaspoon of liquid soap in one gallon of water and mixing well before pouring the solution into a spray bottle for application to affected leaves. As soon as it touches them, its pH changes will help inhibit fungal growth; repeat application if necessary.

    Home remedies such as this one are one of the most widely utilized methods for combatting powdery mildew outbreaks, and should be applied regularly throughout the growing season to ward off an outbreak. They’re especially useful as preventive spraying measures in spring and fall when fungus tends to thrive. Keep in mind, though, that home remedies like this one only act as preventative measures; existing infections must still be addressed with appropriate medications – thus home remedies such as these tend to work best when regularly used over time.

    Neem Oil

    Neem oil, made from the seeds of Azadirachta indica tree seeds, is a natural plant-based oil with antifungal, insecticidal, and antibacterial properties. Used as an eco-friendly and effective alternative to chemical pesticides such as DDT or organophosphates, it’s used on vegetables, roses and indoor houseplants alike as an organic insecticide and mild insecticide – perfect for disrupting lifecycles of insects while acting as mild insecticide. Neem oil also acts as a fungicide against fungal diseases such as powdery mildew and blackspot.

    Neem Oil can be applied both as a spray and soil drench. Sprayed on leaves, it suffocates insects’ breathing holes and kills them off quickly. Furthermore, it may be taken up through some plant roots’ systemic phloem for systemic absorption as an effective insecticide – particularly effective against soft-bodied insect pests like fungus gnat larvae, flea beetles, leafhoppers, mealybugs, and thrips; while also inhibiting root-knot nematodes.

    Neem oil applied regularly can help prevent fungal diseases, but it’s important to be mindful of its limitations. Neem is most effective against fungal infestation when applied at its initial stages when spores are being produced and this doesn’t apply retrospectively.

    Neem oil treatments work by coating spores with dry substances that make germination of their spores harder, thus stopping the spread of infection while providing your plants the opportunity to recover.

    Neem oil may cause burnt leaves on certain plants, so make sure you spray it only under indirect lighting or in the evening. Also avoid spraying stressed plants such as those suffering from heat or drought stress. Before applying it to the whole garden, always test some leaves first and test on multiples as required before spraying neem oil at least weekly, or more often as required.

  • How to Take Care of a Jasmine Plant

    How to Take Care of a Jasmine Plant

    Propagating jasmine is straightforward by taking stem tip cuttings from an established plant. Use rubbing alcohol-sterilized tools and make 4-6-inch cuttings from healthy branches at the top, dipping their ends in rooting hormone and placing in moist soil pots.

    Watering

    As jasmine is a tropical plant, it requires ample moisture. Water regularly during its growing season to ensure the soil remains moist but not saturated or soggy; if unsure whether enough moisture has been provided for, stick your finger 2 inches (5.1 cm) deep into either soil or pot; if it feels dry to you then additional irrigation may be needed.

    If you’re growing a vining type of jasmine, use a trellis or stake to support its vine as it spreads. For shrubby varieties, keep up with regular pruning to avoid them becoming unruly.

    Once the flowers have faded, prune your jasmine shrub to encourage a new bloom cycle and remove any twisted or wayward branches or vines that might have grown unruly.

    Garden jasmine plants can be grown as evergreen vines or trained to drape across an arbor or trellis or form hedges. While containerized growing can be successful, indoor conditions must meet certain criteria to thrive; in particular, direct light must be available for at least six hours each day for this delicate flowering vine – or it could struggle in places like dim shady spots with indirect sun.

    If your jasmine does not produce many flowers, this could be due to insufficient sunlight or fertilization. Use blooming fertilizer such as diluted 7-9-5 solution instead of high nitrogen fertilizers which tend to promote foliage growth at the expense of flower production.

    Indoor jasmine plants thrive when kept in an area with indirect light temperatures of 65 degrees or higher, in full sunlight with temperatures not dropping below 65. Supplemental lighting systems or moving the plant to an area with better lighting may help bring out its blooms more readily. Always give ample water, but be wary not to overwater it as this can lead to root rot issues in plants; inspect soil regularly to make sure it’s not drying out too fast, and always water directly at the base rather than above as this can increase disease risks.

    Fertilizing

    A jasmine plant needs plenty of fertilizer to support strong growth and produce plenty of blooms. Apply water-soluble fertilizer every two weeks during its growing season from early spring until fall – do not fertilize during the dormant period of winter when resting is taking place – applying moderate nitrogen content fertilizers so the plants grow steadily without overwhelming their flowering capabilities.

    Labels provide insight into the amount of nitrogen present in fertilizers. To promote blooming, choose a formula with low nitrogen and high amounts of phosphorous and potassium; if unsure of this ratio, consult staff at your garden center for assistance.

    If a jasmine plant begins turning yellow between its veins, this could be indicative of chlorosis caused by excess nitrogen. To counter this problem and bring back healthful leaves, add liquid chelated iron at a rate of 1/2 teaspoon per quart of water in its watering regimen.

    Regular pruning is vital for maintaining a healthy jasmine plant, especially vineing varieties like Jasminum polyanthum. Aside from removing dead or diseased foliage, pruning unruly vines is also crucial to maintain size control and shape. When pruning stems that have already set flower buds be cautious not to prematurely cut these off as this could affect their development further.

    Indoor jasmine plants need adequate lighting and humidity in order to thrive, so keep them away from drafty areas and place near windows that provide between 6-8 hours of indirect sunlight each day. Heating vents should also be avoided as these may dry out the soil and leave your plant vulnerable to diseases.

    For best results when propagating jasmine, begin sowing seeds either late winter or early spring, approximately three months prior to your average first frost date. Soak the seeds for 24 hours in water before planting them in moist and nutrient-rich potting soil in containers placed in sunny locations with plastic wrapping or dome covers covering them – they should germinate within 30 days!

    Pruning

    Jasmine plants that have grown unruly should be pruned regularly to keep them in check and prevent top heavy branches from collapsing on fences or structures. The ideal time to prune summer or winter jasmine flowers is immediately following flowering season – from June through October in the Southern Hemisphere or March through April for northern jasmine plants respectively.

    When pruning jasmine plants, always use clean and sharp shears for precise cuts that prevent diseases. Furthermore, overcrowded sections or any stems that could block sunlight should also be cut back accordingly.

    People often collect and dry the flowers of jasmine plants for use in teas, potpourris and perfumes. Before harvesting your jasmine flowers for such use, ensure you are growing an appropriate variety; some popular indoor gardens varieties that work include Arabian jasmine (Jasminum polyanthum, zones 8-11), Showy jasmine (Jasminum grandiflorum zones 9-11) and Cape jasmine (Gardenia jasminoides zones 7-11).

    Though different varieties of jasmine may be better suited for outdoor gardening than others, all require some form of pruning in order to remain healthy and produce optimal blooming conditions. Therefore, it is crucial that research be conducted into each variety to find out when and how often its pruning needs to take place.

    Most plants need to be light pruned annually or more to promote full growth and health, including jasmine varieties as well as popular species like lilacs, roses and hydrangeas.

    As well as trimming away dead or diseased sections, when pruning jasmine it is most essential to train it as a vine. This can be accomplished by tying its vertical branches with gardening twine to a trellis or other support and helping guide its growth into dense, compact clumps. You could use small bamboo canes to assist – just be sure that no twine is digging into your plant!

    Light

    Jasmine plants make an elegant addition to any home or office, whether as climbing vines or shrubs. Whatever form it takes, proper care must be given so it will thrive and produce fragrant blooms that can only get better with age. If any issues arise with your plant, simply make a few minor adjustments so it gets back on its path again.

    As with many tropical plants, jasmine requires bright indirect lighting. To give it this, place your jasmine near a sunny window or hydroponic system which receives indirect light, or set your hydroponic system up with indirect lighting so it receives 6-8 hours of bright light each day without being exposed directly to direct sunlight. Use an automatic timer with grow tent or fluorescent lights for continuous lighting each day if you use artificial sources like this one.

    Watering your jasmine plant regularly is also vital. In summer months, only water the top inch of soil when dry. In wintertime, only give it a good soak once or twice every week so as to allow drainage properly and reduce stress from overwatering which could leave your jasmine vulnerable to disease.

    Fertilizing jasmine plants regularly during their growing season is also crucial, and should be done every two weeks during this phase. Be careful to not over-fertilize, however; overdoing it could cause salt build-up in the soil and damage its roots if overdone – make sure you use a balanced and water-soluble fertilizer!

    Your jasmine may occasionally fall victim to fungal diseases and insect pests, making it essential to monitor for signs. Treatment options usually involve removing affected leaves and spraying an organic insecticide like neem oil over it; however, spider mites or brown spots may require special measures like using fungicide spray or insecticidal soap.