

Christmas cactus (Schlumbergera x buckleyi) roots easily in water, unlike many other plants. Simply take some stem or leaf segments from its parent plant and gently twist them together; allow this callousing process to occur for several days before trying to root them.
Choose regular potting soil or one formulated specifically for succulents and cacti. Make sure the container you select has drainage holes, adding some peat moss for good measure.
Place the Cuttings in Water
If you aren’t quite ready to transplant your Christmas cactus yet, propagation in water may be an easier and more effective alternative. This approach is particularly suitable for beginners looking for ways to circumvent rooting in soil.
Start by selecting a y-shaped piece from your plant with two leaf segments, using clean scissors with sharp blades to avoid damaging its leaves. Cut this section from its parent plant using clean scissors with sharp blades to avoid damaging its leaves, before placing in fresh water until two nodes have become submerged and leaving to develop roots for 8 weeks indoors – be sure to keep an eye on water levels regularly to replenish as necessary!
Once a cutting has taken hold and established roots, you can repot it into a planting pot. Fill this container with soil that suits jungle cacti such as perlite or coco coir to improve drainage while being light enough for quick root development. Furthermore, be careful that the mixture does not become compacted – too dense soil will obstruct airflow to the roots and inhibit their development.
Repotting requires handling cacti carefully to avoid damaging its roots, particularly larger pieces that were originally y-shaped; simply plunking these sections into their new home will put open cuts at risk of rot; for optimal results, carefully separate pieces at their point of connection at the base of each section before transplanting them.
Once the plant has been repotted, water it lightly for the first week or so to allow its roots to adjust. Succulent soil tends to dry out faster than other varieties; therefore, avoid deep watering sessions and instead mist lightly with mist to ensure damp conditions throughout its root system and check on it frequently so it does not dry out completely.
Christmas cacti, unlike desert species, don’t thrive under direct sun exposure. Instead, place it in a bright but indirect location with regular fertilization (in particular with 0-10-10 fertilizer which you can find online or at most garden centers), making sure that it is applied according to manufacturer specifications.
Place the Cuttings in a Container
If you have experience rooting other houseplants in water (pothos, Philodendron and monsteras), propagating Christmas cacti should be straightforward. The key is understanding that Christmas cacti aren’t desert cacti and need much more moisture and less direct sunlight than their counterparts do.
When possible, it is best to take cuttings after they have bloomed and the flowers have died off, to allow the plant to establish new roots before flowering again. This allows your cuttings time to develop before blooming again!
To cut a cactus stem, take care in trimming an outer section with sharp pruning shears or scissors and selecting a segment containing three or more leaf segments and two nodes – with one node being where roots will form – from your plant and cut it away using clean, sterilized scissors. Allow this segment to dry out for two or three days so as to resist rot and take root either in soil or water.
Once your cactus has dried out, place it in water until two of its lower nodes have submerged. Place its container in bright but indirect sunlight until its root system grows as long as its stem (usually six to eight weeks).
Tip – when propagating Christmas cacti in water, some segments may appear limp and faded – this is completely normal and may indicate overwatering or not enough indirect sunlight; nonetheless it indicates the plant taking root; they should usually recover within one or two weeks.
Once your Christmas cactus has developed its new roots, it’s time to move it out of water and into soil. Make sure that it drains quickly – sandy soil works best – this type of material can be purchased in gardening stores or mixed yourself by adding equal parts organic compost and regular potting soil in equal proportions. In order to give its roots the most nourishment available to it, add some kelp meal to the mixture as this will provide extra vitamins for absorption by its roots.
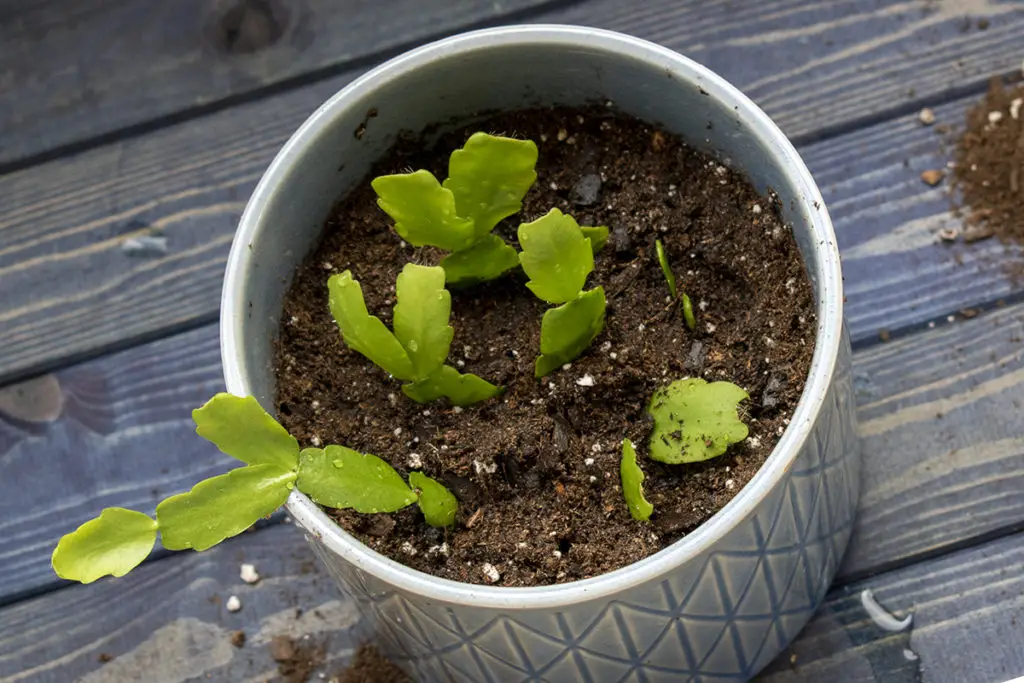
Place the Cuttings in a Pot
Christmas cacti are very delicate plants, easily breaking. To prevent mishandling during propagation, many prefer rooting them in water rather than soil – as this requires less handling but may take longer for roots to take hold. According to gardener Vladan Nikolic from Mr. Houseplant LLC, cuttings may take longer to callous over in water than when planted directly into soil, making propagation slower overall.
Rooting in water requires a glass jar with pebbles and enough water to cover them. Add your cacti cuttings so only their bottom tips are in the water, then cover everything with pebbles. Leave for one week. Alternatively, try rooting using coarse sand mixed with perlite or peat as an alternative medium; in either case be sure to callous over overnight before watering your rooting medium before planting your cuttings into it a quarter of their length into this solution.
Once your cacti have established roots, place them in an indirect sunlight area and lightly water their soil daily to keep it moist but not saturated; excessive water may cause it to rot the plant.
As soon as your Christmas cactus has reached full maturity, it’s time to repot into a larger container. Over time, as it grows larger and demands new soil changes for its continued health and bloom, choosing one with at least six-inch width is important when repotting.
As you repot, it’s also beneficial to give the plant a light dose of fertilizer. This will encourage healthy growth and help it look its best during the holidays. Flowers usually appear around November or December and feature both yellow and pink blooms; two main cultivars: Truncata and Buckleyi groups have differing pollen colors with Buckleyi producing pink pollen while Truncata typically displays yellow pollen.
Place the Cuttings in a Vase
Christmas cacti are one of the few plants that don’t require soil for propagation; their cuttings can even be planted directly into water for propagation! While this method might work for giving away cuttings or having difficulty planting them directly into soil, this approach won’t yield as many successful plants.
Begin by cutting a stem or leaf off of your current Christmas cactus plant after it has finished blooming and the flowers have fallen off. Next, place it in water in a vase, jar, or container so two nodes of its stem are submerged; add more as necessary; place in indirect sunlight until roots develop and allow time for root formation to take effect.
If the cutting does not develop roots within several days, try again. When roots have developed they should be transplanted to another pot with fast-draining potting mix; for optimal drainage it would be beneficial if this were specifically tailored for succulents and cacti.
Once your cuttings have been planted, provide them with ample water before placing in indirect sunlight for best results. If they don’t appear to be doing well enough, try adding more fertilizer; but beware not overfeeding as that could cause them to leggy and eventually die off.
Over the following weeks, your plants should be ready to go outside and become part of their outdoor environments. At this stage, they should be watered regularly but not excessively as overwatering may damage roots and lead to root rot issues. Furthermore, any clumps of branches must be loosen periodically so air can circulate throughout the soil.
Christmas cacti are popular houseplants that can easily be multiplied in your own home. By following the steps outlined here, you can have many blooming houseplants for yourself or as gifts for friends and family members. By the end of this project, your favorite blooming houseplant will have become multiple beautiful new plants to share.