
Carrots are one of the easiest vegetables to regrow at home. Not only can this activity be enjoyable for the whole family, but it can save money by making use of greens that would otherwise end up in your compost heap.
Regrowing carrots requires starting with fresh carrots that have been cut of their top greens while leaving an inch or so of roots intact. Placed the cut carrot in a glass filled with water, you should see growth within several weeks.
Prep the Carrot
While you cannot regrow an entire rooted orange vegetable from scratch, carrot greens or tops provide plenty of vitamins, minerals, and nutrients that help save money and reduce food waste – not to mention provide an educational activity for kids and teenagers!
Before placing carrots in water, it’s essential that they be prepped properly. Be sure that their cut ends are clean and that there’s still some green visible; this will prevent rotting during their rooting process. Next step should be filling a shallow bowl or container with just enough water so the carrots are submerged but not fully submerged as this prevents rapid rotting and ensures success with root development. It is vitally important that these steps take place as otherwise they will quickly rot away without fully immersing them completely in water – otherwise their roots may never grow back!
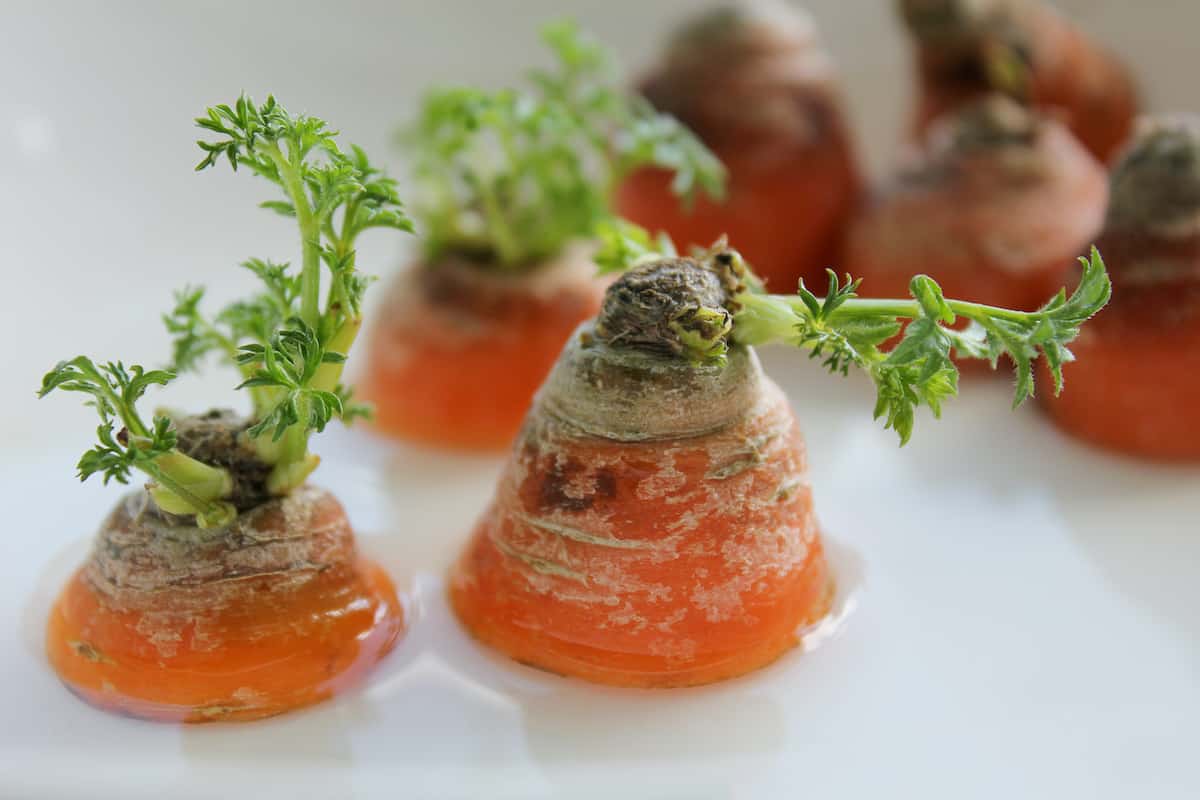
When placing the carrots into water, make sure they are placed sliced side down and covered halfway with water. This step is vital because this allows their cut sides to begin forming roots while at the same time helping prevent their greens from becoming overly wet and potentially leading to rot. Once your carrot(s) have been submerged in their own private container of sunshine you can observe as their roots and shoots start growing!
Once the greens have established themselves, thin them so there is about an inch between each carrot plant – this will enable your carrots to flourish! You can use sharp scissors or garden shears, or simply push the extra plants aside with your hands.
If you plan to grow carrots in a pot, be sure to start off by filling it with low-fertility soil mix containing one part sand and one part potting mix. Fill up to within 1″ from the top before sowing seeds thinly over its surface and watering thoroughly after sowing them – then put in an area with plenty of sunlight; carrots tend to grow quickly but require plenty of light in order to reach their potential.
Place the Carrot in Water
Carrots can thrive in almost any climate, though optimal growth occurs when planted in rich and well-draining soil. Although carrots can also be grown in shaded areas, more water may be required than when grown in full sun. Carrots are one of the quickest crops to regrow quickly – an excellent way to teach kids about plant development! However, seeds must be started first for success; otherwise regrowing from seeds is more complex and time consuming.
Start the regrowing process using a clean knife by cutting off the top of a carrot, leaving approximately half an inch of exposed carrot flesh above its greens. Only fresh carrots should be used and those which have started rotting should be avoided. Placed in a glass filled with water that has been filtered to remove chlorine or fluoride before filling until reaching bottom of carrot, the carrot should then be placed somewhere shady where indirect sunlight but not too cold lighting exists, with regular monitoring for any signs of mold growth while its water should also needing replacing regularly for optimal growth.
After several days, your carrot should begin producing small green shoots and roots as an indicator that its food sources have expanded. Once this stage has been reached, transplant it either into well-draining soil in a pot, or directly into the ground during warm spring and summer weather conditions.
Once transplanted, carrots need to be cared for as any vegetable crop would. They require plenty of water, while keeping soil loose to avoid compacting which could cause rot. A light application of fertilizer low in nitrogen should also be made; otherwise it may promote leaves growth instead of root development.
Regrowing carrots can be an enjoyable and cost-saving way to lower grocery costs, while also teaching your children about where their produce comes from – something which has become especially relevant in an age when many farmers use synthetic fertilizers and pesticides in the cultivation process.
Keep the Carrot in Water
Carrots are root vegetables, and like other roots they require moisture in order to thrive. That is why it is best to store carrots in a cool location (like the crisper drawer in your fridge) with some water in order to prevent softening and rotting; or for long-term storage they can also be placed into damp sand. However, when growing carrots from seeds it may be wiser to remove their greenery since this can take away moisture away from their roots, leading them to go soft or even rot much sooner.
As long as the greens remain attached, carrots with attached greens are edible; just ensure you clean and trim them to approximately one to two inches long before eating them. When it comes to regrowing carrots from scratch, fresh, undamaged ones will work better since damaged surface areas could prevent new leaves from growing on them.
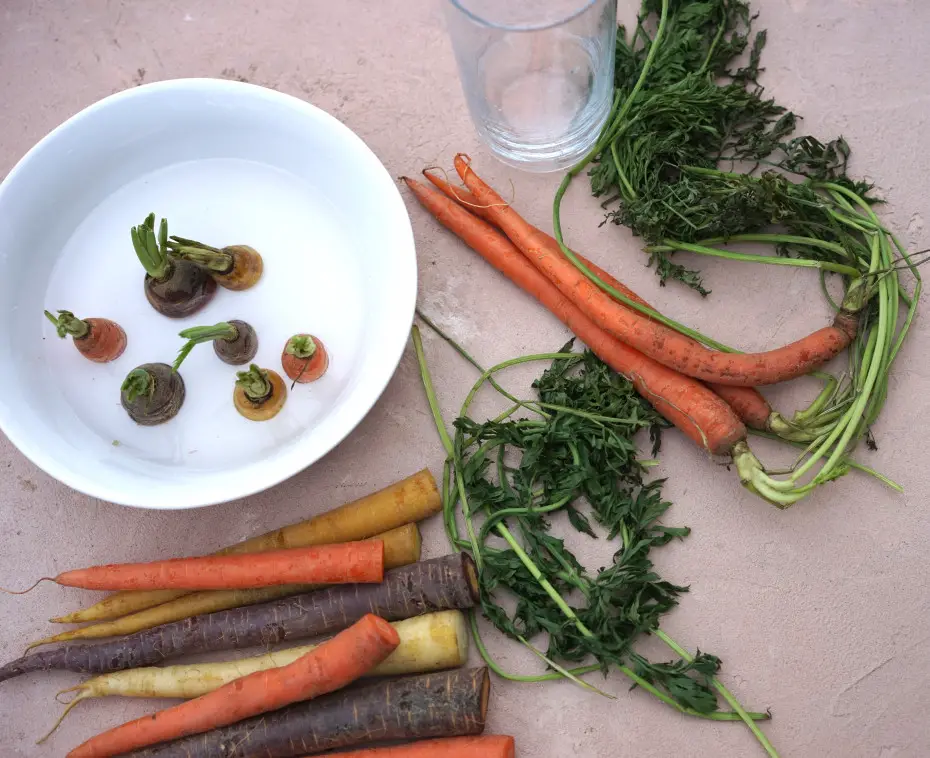
Start by placing carrot stumps in a bowl containing one to two centimeters of room-temperature water and placing this near an abundant window for sunlight. Let this sit for several days, adding additional water as necessary until new leaves appear on your carrot. Additionally, change out your water every couple days in order to prevent fungus growth in the bowl.
Now, transfer your carrots to a pot or planter with fertile soil, placing it in an area with plenty of sunlight. Or you could plant directly into the ground if your climate zone allows.
As you can see, regrowing carrots from scraps is relatively straightforward and makes the most of homegrown or store-bought carrots; you can do it on a small scale for manageability and cost savings! Regrowing can also save money as parts that would otherwise be wasted are reused; give it a try now and see what crops come forth!
Water the Carrot
Regrowing carrots is an enjoyable, simple, and fulfilling hobby that anyone can do – no green thumb required! Reducing food waste while knowing exactly where your carrots come from makes this activity very satisfying and financially advantageous as it eliminates the need to purchase fresh ones at grocery stores and eliminates food waste altogether. Plus it can save money! Best of all regrowing can be accomplished without needing professional assistance as anyone with soil can do it themselves – the key being any effort required on their part or that of someone who does have more knowledge.
In order to regrow carrots, you will require a shallow container with some of the carrot top. Glass, bowl, or plastic containers work best; make sure the water source is filtered (preferably bottled), as chlorine or fluoride in tap water may damage or kill its roots. Once your container is filled with water and your carrot top submerged completely, set it in direct sunlight in a sunny window and continue watering regularly – remembering that more frequently replacing water might be required than in soil growing methods.
Once conditions are right, a root will form within several days and can be transplanted directly into either your garden or pot for growth in soil rather than just water alone. As with all fertilizer applications, however, extra nitrogen might cause your carrot to produce green leaves but no roots at all! So be mindful when applying too much fertilizer as too much nitrogen could cause its leaves but no roots!
When planting carrots, dig a hole just larger than their root ball and loosen any compacted soil at the bottom. If growing it in a pot, consider adding mulch as this helps prevent weeds and retain moisture. When finished planting your carrot, water it thoroughly to settle the soil and eliminate air pockets before giving a light dusting of low nitrogen fertilizer for best results. Adding this type of fertilizer may promote root rather than leaf growth.