
If you’re an orchid lover, then you know that Orchids are not only beautiful plants to look at but can be quite expensive to purchase. Did you also know that you can propagate your own orchids from cuttings for free? It’s true! In this blog post, we will teach you how to propagate your own orchids from cuttings so you can enjoy these lovely plants for years to come. Stay tuned!
Dendrobium Nobile Flowers:
– Houseplant care: Bright light
– Temperature: Warm to hot temperatures (summertime), Cool to warm temperatures (wintertime)
-Dendrobium Nobile is an evergreen, monopodial epiphytic orchid. Most Dendrobiums are sympodial, so the plant grows horizontally with age and produces many pendants, branching stems covered by distichous, alternate leaves on a terminal stem. When a new lead is produced a flower spike will emerge from its leaf axil. The inflorescence can be up to 1 meter long and may contain 12-20 flowers of various colors. Flowers have three petals and three sepals which are not spreading but reflexed backwards against the ovary as in the genus Paphiopedilum. The flowers are fragrant and sweet scented with a long period of blooming. The main flowering season is from autumn to winter. There are a number of species and hybrids available in the market with flowers ranging from white, green-yellow, peach, yellow, orange to red.

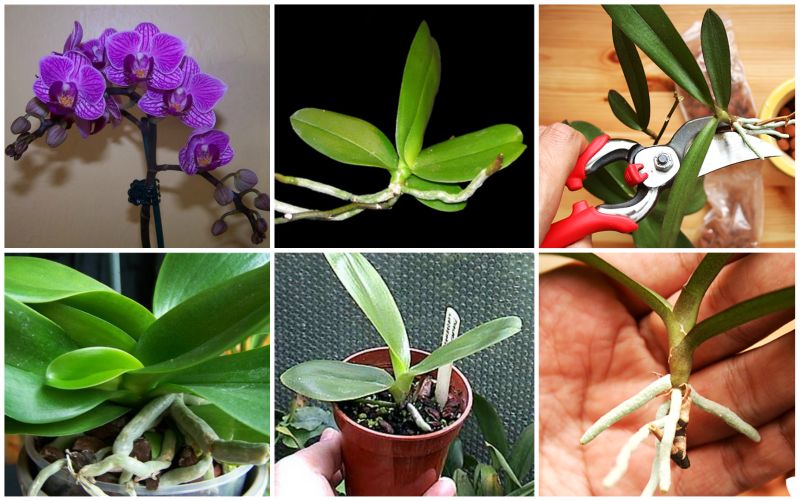
Dendrobium Nobile stem cutting care:
– Pots for cuttings: Dendrobiums need large pots at least 10″ (25 cm) wide so they can grow properly. Smaller sizes do not allow the new root growth on lower nodes to develop normally. You can use plastic or clay pot but it’s better if you don’t reuse the old potting mix as mineral salts may accumulate over time and hamper new growth development. If you’re using clay pots avoid reusing them because exposure to water causes the clay to expand and crack, which reduces aeration in the pot.
– Soil mix for cuttings: A medium grade orchid bark works well. Avoid using fine bark because it’s difficult to anchor the cutting properly so the new roots won’t fall before, they start to develop. You can add some perlite or coarse river sand if you like, but it’s not necessary at all.
– Potting Mix watering: The soil should be just moist enough so that it doesn’t crumble when you lightly squeeze a handful of soil without water in your palm. If you’re unsure about watering wait until the existing mix starts to dry out slightly before watering again, trying not to get any leaves when you water. Water only in the morning, allowing the mix to dry out in the afternoon and repeating this routine for about a week.
– Potting Mix Temperature: 65-75 F (18-25 C) is fine. Do not use any artificial heating because it will burn or damage new roots and leaves.
– Potting Mix Air Humidity: Moderate to high humidity is essential for new roots to develop. If the air humidity in your home is very low use an electric heating pad under the pot, set at 65-75 F (18-25 C).
– Plant Pots with Dendrobium Nobile cuttings: When using clay pots put gravel or broken pot shards above the drainage hole so water doesn’t collect on them and rot the roots. Let only one node stick out of the soil after you planted it because this is where new roots will emerge first. Keep all other nodes below soil level. Make sure no leaves are touching the soil as well – they can rot easily due to over watering. Some people prefer leaf sheet to cover the new cuttings to prevent any leaves from touching soil, but it can dry out very quickly, so you must water more often.
– Planting Dendrobium Nobile Stem Cuttings too deep: The cutting should be planted at approximately the soil level as originally grown on plant. When planting a rooted section lower the potting mix around the stem cutting by about half an inch (1 cm). You can also plant “lower” nodes if original location is not important anymore because you only need two or three roots to start new growth successfully.
Newly potted Dendrobium stem cutting care:
– Newly potted Dendrobium Nobile cuttings: Keep them out of direct sunlight and water only every other day. Small pots with just few nodes below soil level dry out surprisingly quickly, so it’s important to not overwater new plants since you can easily drown the new roots.
– Newly potted leaf sheet on top: Many growers prefer leaf sheets over newly potted plants because it appears to be a better option compared to traditional plastic or even peat pots sometimes used for rooted cuttings. The covering prevents any problems from over watering but at the same time allows air circulation around leaves which helps reducing diseases from foliar pathogens. Just make sure that your leaf cover does not create a greenhouse effect – ambient humidity should be no more than 50%.
– Newly potted leaf sheet on bottom: Many growers prefer covering the newly potted cuttings with aluminum foil, plastic, or even black saran wrap during rooting. The covering prevents water loss and helps preventing foliar diseases, but it also creates higher humidity below the sheets, which makes this option less suitable for delicate tropical plants. In some instances, high humidity can contribute to pests such as mealybugs infesting new rooted Dendrobium Nobile cuttings planted inside a pot covered with a sheet from bottom.
– Temperature for newly potted Dendrobium Nobile cuttings: During root development 65-75 F (18-25 C) is fine. For growing them on to new plants keep the temperature at 65 F (18 C) during the day and about 10 degrees lower at night.
– Watering newly potted Dendrobium Nobile cuttings: new leaves emerging from nodes below soil level indicate that new roots are developing nicely. Usually after thin, flexible roots are formed water more often since roots use lots of energy to grow properly. Water only when the mix starts to dry out slightly before watering again, trying not to get any leaves when you water. Watering every third or fourth day is good for young plants but more often if high humidity levels are present in your growing area. Older established plants can be watered even less frequently but make sure no one leaf gets too dry – sometimes these thin flattened leaves naturally curl upwards to let less water get inside and this is fine until roots finally start to develop, which usually happens after growing a few new leaves.
– Dendrobium Nobile care for rooted stem cutting After about two- or three-weeks roots are fully formed under soil level to start the next phase of growing your plant into a beautiful mature specimen. This takes several months but when you see shoots forming on top around four months later your efforts will pay off when you gradually expose the young plant to brighter conditions over time until it’s finally moved outside if suitable weather conditions allow. But before that, another few months will pass until the plant is big enough to flower – not before >seven to eight years of care and attention.
– Sign of life: Look for new growth on top with variations in colors and textures your plants may have, as well as variegated leaves among solid-colored ones. When you see a tiny difference between mature and newly emerging leaves it’s time to start watering more often because new roots are forming below soil level already. You can cut away most of the old root ball if you don’t want it anymore but keep at least one or two thick healthy looking unpruned roots attached to young shoots which naturally emerge from nodes below soil level. It’s advised to water after pruning all old roots so that all newly emerging roots get the same amount of water.
– Pruning older leaves: After your plant is established in its new pot it’s time to slowly start removing old leaded growths while not damaging any young shoot tips that emerge from nodes below soil level.
Conclusions:
– Dendrobium Nobile should be repotted every 3 years to keep growth under control, especially after the plant has finished flowering.
– The length of time it takes till your cutting starts growing depends on many factors so wait patiently.
– Keep the newly potted cuttings moist, not wet, or dry for best results.
Aftercare:
– Place bright filtered light spot over your newly potted cuttings by rotating them according to season changes.
– Keep ambient humidity around 50% during rooting phase, if possible, without giving too much water at once. After that aim at 65% for optimal growth indoors.
– Exposing newly rooted plants gradually to brighter light will help with development into beautiful mature specimens in a few years’ time.
– From the day you rooted a stem cutting from a mature plant, up to 3 years it takes for your plant to finally flower.