Category: Reviews

  • What Does Crab Apples Look Like?

    What Does Crab Apples Look Like?

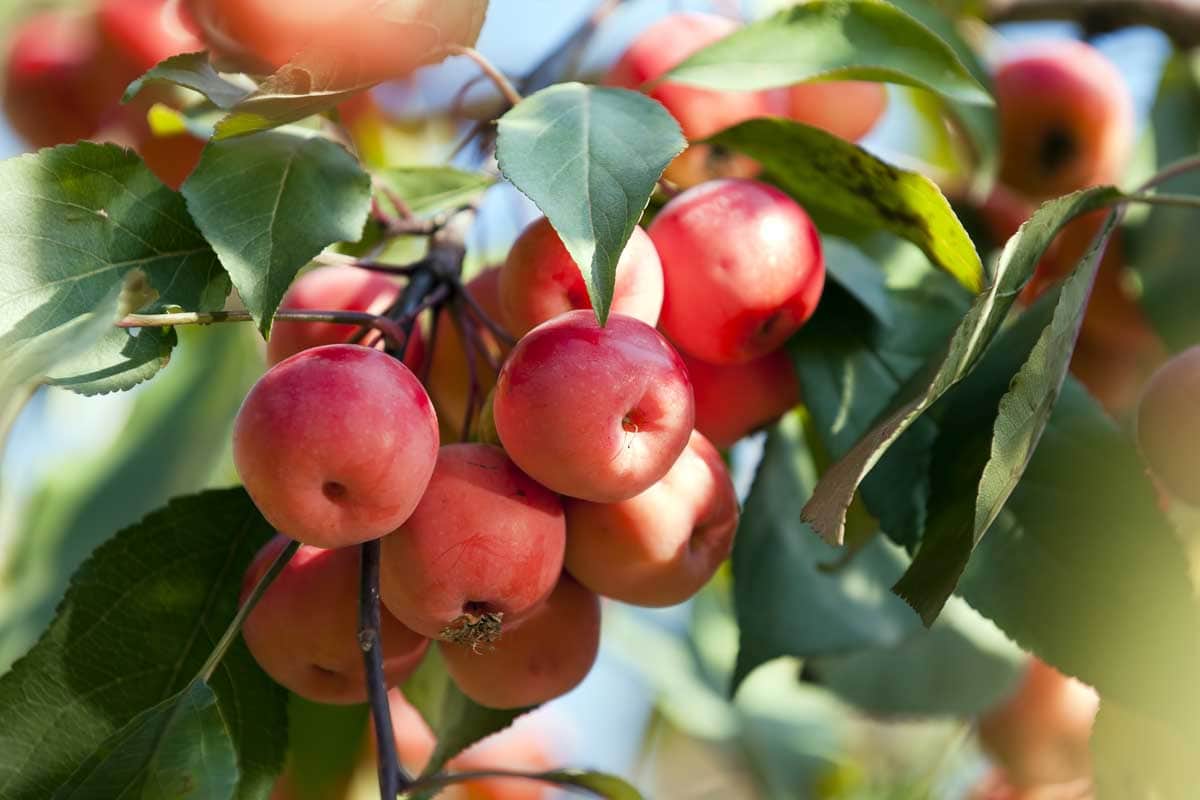
    Crab apples add color and vibrancy to any garden, and there are various varieties to choose from. Some are edible while others contain cyanogenic glycosides which your body turns into cyanide! Beware though as this could pose a health risk!

    Prairifire crab apple features pure white fragrant blossoms in spring and small orange-red fruits which linger well into autumn. The leaves emerge purplish before turning bronzy green with subdued fall hues.

    Fruit

    Crab apples make a delicious ingredient in jellies and fruit leather dishes, thanks to their higher levels of malic acid that produce stronger flavors than their domesticated counterparts. Some varieties are sweeter while others more tart, all boasting the tanginess necessary for withstanding high heat cooking temperatures.

    Crab apple trees make an elegant addition to any garden, offering colorful flowers and fruits that persist into winter. Their flowers and fruits may resemble those of other wild species, so it is crucial that before harvesting or eating any specimen from one, its identity is confirmed before doing so. A foraging guide or local forager can assist with this; for your own safety it may also be wise to consult an expert before eating wild food yourself.

    Crab apple trees tend to be free from serious diseases, requiring little pruning in order to remain visually appealing. Reshaping new shoots during summer will keep their canopy more compact and prevent overcrowding. Dead branches should be pruned as soon as they appear; however, doing this in damp weather could increase pest infestation and disease spread.

    Many crab apple varieties, such as ‘Butterball’ and ‘Comtesse de Paris’, feature fragrant white or pink blooms that develop into vibrant pome fruits. Other varieties, like Royal Raindrops and Prairie Fire have magenta-pink blossoms and fruits with reddish-pink hues; their foliage offers stunning combinations of yellow, apricot bronze, and purple shades in autumn.

    Flowers

    Crab apples may not be as juicy as their domesticated counterparts, but they make fantastic pies and preserves due to their higher levels of malic acid. Plus, their tart flavoring complements well any recipe calling for apples in general!

    Crab apple flowers are fragrant flowers ranging from white to pink or carmine hues. They often appear before leaves emerge and form beautiful, spherical clusters. Some varieties feature double blooms while others only possess single blossoms.

    Crab apple fruits are small and typically feature deep yellow, orange or red hues. Many varieties are self-fertile – meaning you do not require another apple tree nearby for pollination purposes – making one crab apple tree capable of pollinating numerous culinary varieties and other types of fruit trees.

    Gardeners increasingly favor trees with vibrant foliage, such as crab apple varieties. Some, such as Prairie Fire and Summer Wonder varieties, feature leaves with deep red or purple shades that remain beautiful throughout summer and into fall.

    Although crab apple varieties prefer full sun conditions, they will also tolerate partial shade conditions. When planting young plants for the first time in spring or fall to give their roots time to establish themselves before summer arrives and puts too much stress on them, give a thorough watering when planting and continue watering regularly after their roots have established themselves.

    Crab apples in autumn at RHS Garden Hyde Hall.

    Leaves

    Crab apples make a wonderful choice for modern gardens with their smaller size and suitability to more restricted spaces. Their spring flowers, autumn-colored foliage, and fruit provide interest throughout all three seasons of the year.

    Leaves start off light emerald green in springtime before deepening to an intense shade over summer and eventually dropping to golden yellow by autumn. Some cultivars even feature variegated leaves of different shades of yellow, orange or red!

    Crab Apple Fruit is round in shape with an average diameter of less than 4cm and hangs from trees all winter long. Coloration ranges from golden-yellow hues through scarlet red hues all the way to pinkish or white hues; depending on where they grow in their habitat.

    Crab apple fruit provides anti-oxidants and phytochemicals in small doses; however, its seeds can be toxic when consumed in quantity (1).

    If your species of tree produces toxic seeds, remove the fruit as soon as it ripens from its tree and use it for various purposes such as making syrup or jelly from it, adding tart flavor to pancakes recipes, providing birds with nutrition or adding tart notes in pancakes dishes. Remember to cut these fruits so as to hide their seeds – otherwise their consumption could result in nausea and vomiting!

    Bark

    Crab apples, the wild ancestor of commercial apples we buy at stores, come in an astonishing array of sizes, colors and flavors that vary immensely in size, flavor, size, shape and texture. Some can be too sour and bitter for consumption while others contain seeds with toxic cyanogenic glycosides that convert to cyanide when consumed raw.

    Crab apple trees offer numerous advantages: they come in all sorts of shapes and sizes, bloom each spring, produce colorful fall fruit, and offer beautiful winter leaves displays. Furthermore, they’re hardy and drought tolerant – not to mention more natural-looking than many large ornamental apple and pear trees found throughout most landscapes.

    Many crab apple varieties are resistant to diseases that threaten apple trees, such as cedar-apple rust and fire blight, making them great choices for home gardens. Some, like Profusion, feature magenta pink blooms with bronze green foliage in summer that makes jellies excellent! Others work better as specimen or hedge plants, such as Hopa Flowering Crab which grows slower and can survive up to Zone 2a hardiness.

    This variety has fragrant pink-rose flowers and bright, green foliage which turns yellow-bronzy red in fall. Additionally, it’s one of the toughest varieties around with good resistance against disease except apple scab.

    Diseases

    Crab apple varieties vary in their susceptibility to various diseases. Fire blight can kill trees if left uncontrolled while cedar apple rust infects leaves, fruit and flower buds; both require special measures in order to control with an antifungicide treatment plan.

    Aphids (Aphis spp) are soft-bodied sucking insects with pear-shaped bodies that feed off of fresh new growth to extract sap for sucking. Aphid infestation can severely hamper crab apple tree health by stunting and distorting branches as well as producing stunted or bent branches. Spraying infested leaves with strong water spray every other day for three days should dislodge any pests present.

    As with other apple trees, crab apples may also fall victim to the fungal disease scab, characterized by dark blotches on leaves that spread as they develop, eventually leading to them wilting and falling prematurely. Fungus invades fruit as well, producing circular spots on fruit with rough surfaces before it rots prematurely before reaching maturity. Applying garden sulfur fungicide throughout spring and early summer can reduce its severity significantly.

    Some crab apples are resistant to scab, such as Harvest Gold and Sutyzam varieties. By selecting disease-resistant varieties and spraying trunks, stems, branches, leaves and fruit with fungicide, the incidence of scab on susceptible crab apples may be reduced significantly. Good sanitation practices must also be observed; for instance removing and discarding infected debris from around their tree each spring and collecting fallen flowers fruits twigs leaves throughout their growing season are all key practices that help ensure healthy trees.

    Pruning

    Crab apples make an eye-catching addition to any garden. Bursting into bloom every spring with lovely petals, they add vibrant splashes of color throughout the year. Their autumn fruits make delicious jelly or add tart notes to apple sauce recipes – not forgetting their easy growing characteristics such as espaliers, containers or hedges!

    Pruning a crab apple tree is essential in controlling its shape and eliminating dead and diseased branches from its canopy. Pruning should take place either late winter or early spring before new buds start forming, in order to minimize damage and ensure you don’t accidentally cut off or damage any new growth. As with other plants, crab apples require regular pruning in order to remain healthy and productive. Pruning should include trimming any fast-growing vertical shoots near their bases called suckers and water shoots that sprout from the ground near the base – such as suckers and water shoots – which could potentially become competing trunks that compete with the main branch and result in its death. Furthermore, any branches showing signs of disease like fire blight should also be pruned back. These branches appear as being burnt-looking ash colored branches which will eventually spread further than your plant can tolerated!

    Pruning can also improve air circulation and help to prevent fungal diseases from arising in your crab apple tree, keeping it looking neat and tidy! Plus it keeps things neatly organised!

  • Miracle Grow – What Is It?

    Miracle Grow – What Is It?

    Miracle-Gro is an easy and convenient fertilizer designed to give plants all of the essential nutrients they need for healthy plant growth. Available both water-soluble and granular forms, it allows your vegetables to flourish large and robustly.

    But it’s important to realize that Miracle-Gro can pose potential hazards if overused. Excessive application could endanger vital soil microorganisms essential for plant health, potentially killing off those needed to promote proper growth of plants.

    It is a fertilizer

    Miracle Grow fertilizer from The Scotts Company helps plants flourish faster and healthier, and can be applied directly onto flowers, vegetables, grass, shrubs and houseplants of various kinds. Available both liquid and granular forms for easy application to soil or directly to leaves of plants directly, Miracle Grow may not be appropriate for organic gardening but could serve as a supplement.

    Miracle Grow contains both macronutrients and micronutrients to promote plant health. Macronutrients include essential plant growth factors like nitrogen, phosphorous, potassium, sulfur calcium and magnesium while micronutrients include iron copper manganese molybdenum boron that is taken up through roots while macronutrients pass through leaves for absorption by roots. Miracle Grow makes an excellent home gardening choice because of its easy usage and safe performance if used appropriately.

    However, before using this product it is vitally important to read through its label carefully as misuse could have serious environmental repercussions and even damage plants if improperly diluted. Furthermore, overfertilizing crops must be avoided to keep them looking their best!

    Over-fertilizing plants is deadly, so it is vital that you know how much miracle gro to use. If your plants seem to be growing slowly or their color differs than expected, that may be an indicator that too much miracle grow is being applied.

    Miracle Gro contains multiple elements to supplement its main nutrients: Urea, Urea Phosphate, Potassium Chloride, Boric Acid and Ammonium Phosphate. Urea provides carbon, oxygen and hydrogen while Urea Phosphate increases nitrogen and phosphorous availability while Boric Acid protects against fungal diseases while EDTA (ethylene diamine tetra-acetic acid) aids plant absorption of iron and manganese.

    It is a water-soluble fertilizer

    Miracle Grow fertilizer is a water-soluble fertilizer designed for indoor and outdoor plant use, featuring an easy-to-mix formula that quickly feeds vegetables, flowers, trees, and soil alike to produce noticeably larger roots, stems, petals than unfed plants and healthier leaves and more beautiful vegetables from its soil-feeding effects. Available both liquid and dry forms for convenient application directly onto soil or using garden hose applicators (granules spread easily across planters or containers).

    Miracle Gro is an ideal choice for any garden. It provides ample quantities of readily-available nitrogen that enables fast plant growth. However, Miracle Gro works by circumventing natural soil microbes by outsourcing their tasks and killing off healthy bacteria, fungi, and earthworms that provide essential plant nutrition. Synthetic fertilizers contain too much salt; misusing them could damage both leaves and roots of plants causing irreparable harm to them.

    Miracle Grow contains ingredients such as urea, urea phosphate, potassium chloride, boric acid, ammonium phosphate and iron EDTA. Urea provides carbon, oxygen and hydrogen while potassium chloride encourages cell division while boric acid can prevent fungal infestation. Ammonium phosphate adds nitrogen and phosphorous while iron EDTA (ethylene diamine tetra-acetic acid) allows plants to absorb iron more readily.

    To use Miracle Grow, mix it with water according to its instructions. Even if it rains eight hours post application, Miracle Gro will still be effective. If it remains unspent within several weeks after use, store in a cool dry location. Overusing Miracle Gro can harm the environment; for best results use it only when necessary. Also note that its application to cacti or succulents could burn their leaves.

    It is a granulated fertilizer

    Miracle Grow fertilizer is an all-purpose fertilizer made up of both macronutrients and micronutrients, made up of synthetic ammonium granulated product formulated for plant use. Safe to be used on vegetables, flowers, bushes, grass and houseplants alike if used according to package directions; overuse can damage plant roots or stop them absorbing water, leading to their death.

    Miracle Grow’s main ingredient, Urea Phosphate (NP), provides nitrogen and phosphorous to plants. Additionally, potassium chloride, boric acid, ammonium phosphate, iron manganese EDTA as well as several other elements help ensure all parts of a plant receive equal quantities of essential nutrients. The mixture in miracle Grow ensures this optimal results!

    Used correctly, miracle grow will promote plant growth and flowering. You can apply it directly to the soil or spray directly onto crops or leaves for maximum results; however, for optimal results it’s best to sprinkle the fertilizer around crops so as to prevent burning their roots. It is also wise to apply miracle grow before light rainstorms start so it will mix more quickly with the soil.

    At the same time, it’s essential to be mindful that too much miracle grow can damage plants. Excessive usage can kill even healthy and well-fed plants. Signs of overuse include reduced flower production, excessive foliage or leaves changing colors – any time these signs appear it may be time to stop using miracle grow. For your own protection and in order to keep hands safe from its chemicals it would also be prudent to wear gloves when handling miracle grow.

    It is a liquid fertilizer

    Miracle Grow, produced by The Scotts Company and designed to assist gardeners even those with brown thumbs in growing plants, contains both macronutrients and micronutrients in a water-soluble liquid form that should be mixed according to label instructions for best results. It should be applied directly onto vegetables, bushes, flowers grass or houseplants with best results being realized over time.

    Miracle-Gro is a chemical plant food composed of synthetic ammonium and nitrates, producing off-chemicals harmful to soil microbes, worms and other forms of life in the soil – ecosystems which provide essential nutrients directly to plants via natural processes in their ecosystems. Synthetic fertilizers serve as IV drips that bypass these ecosystems to deliver vital nutrient directly into plant roots.

    MG provides plants with excessively accessible nitrogen to promote rapid and lush growth, but this poses a problem as nitrogen is only one nutrient they require – in fact it produces off-chemicals harmful to soil bacteria and fungi which provide vital feedstock to nourish plants in their natural state.

    Urea phosphate (UGP), the main component in MG, contains approximately 17 percent nitrogen and 43 to 44 percent phosphorous derived from reacting between urea and orthophosphoric acid, produced when mixed with water, as well as humic acids – complex organic compounds which improve soil structure while providing essential nutrition.

    Homemade Miracle Grow fertilizer can be easily produced using household ingredients such as Epsom salt, baking soda and ammonia. When combined together they create an excellent fertilizer solution for all sorts of plants; using baking soda to break down weeds while ammonia breaks down any salt in the soil is especially effective at breaking it down quickly compared to store-bought varieties. This homemade solution provides much better results.

    It is a dry fertilizer

    Miracle Grow fertilizer is an extremely versatile plant fertilizer. Containing high levels of nitrogen, phosphorous, and potassium as well as being applied directly onto soil surfaces with water, this chemical solution offers many applications.

    Miracle Grow may be safe to use in home gardens, but overusing it could prove hazardous. Too much Miracle Grow can alter the natural balance of soil and cause deficiencies for your plants. Furthermore, overexposure could burn their roots. Therefore, always read and follow all instructions provided on its label; consult a horticulturist or expert when in doubt regarding how best to apply the product.

    Miracle Grow should be used on dry soil and watered immediately afterwards if desired. For best results, apply Miracle Grow before dark to allow its nutrients to soak into the ground overnight. However, make sure to check weather reports first as heavy rainfall could wash them away.

    Miracle Grow can be an indispensable tool in growing garden plants successfully. Used correctly, it will dramatically accelerate their rate of growth while simultaneously making them bigger than usual – in some cases even twice their normal size! Ideal for flowers, vegetables, shrubs and houseplants alike.

  • How to Kill Potatoe Bugs

    How to Kill Potatoe Bugs

    Potato bugs are pesky insects that frequently attack potatoes, tomatoes and other solanaceous plants. These nocturnal predators have painful bites which they inflict upon plants they attack.

    The best way to combat them is by keeping your garden free of debris and planting cover crops that attract natural predators. Bt is also effective as this strain of soil bacteria paralyses certain insects’ digestive systems during larval stages and starves them out causing starvation.

    Cayenne pepper and garlic spray

    Cayenne pepper contains capsaicin, which irritates potato bugs and other insects and is an effective natural repellent, making it an economical and organic way of controlling pest problems. You can dilution it with water to create an insect spray or use as soil amendment, though its effectiveness against all forms of pest may not be guaranteed.

    There are various homemade garlic-and-cayenne spray recipes that can be used to effectively repel or kill potato bugs, which is one of the more annoying insects found in home gardens. Most require basic ingredients that most gardeners already possess; the sprays can either be applied directly onto plants for instant kill-or-repellency effect, but for best results combine this strategy with crop rotation or planting barrier crops as preventive measures.

    One quick and inexpensive recipe uses a mixture of equal parts vinegar and dish soap as a quick and inexpensive solution that can quickly kill both egg-laying potato bugs as well as adult ones; best used once weekly. Spray this solution onto leaves of plants only; it should never come into direct contact with edible leaves that will be eaten.

    Homemade sprays that combine garlic and cayenne pepper are another effective means of pest control, particularly against potato bugs. While they don’t last very long in the refrigerator, you should use this homemade solution immediately for maximum efficacy.

    Garlic-and-cayenne spray is a popular way to repel slugs, snails, ants, grubs, deer rabbits, groundhogs and woodchucks. A few cloves of garlic mixed with one teaspoon of cayenne pepper blended in water can be processed through a blender or food processor before being strained through cheesecloth to remove any chunks. Once blended and strained it can then be transferred into a spray bottle and applied directly on plants as well as around their perimeters.

    Bacillus thuringiensis bacteria offer another natural form of pest control. While non-toxic to humans and plants alike, this soil bacteria is toxic to many insects such as potato bugs. As an effective alternative to chemical insecticides, this natural solution can even be used in edible gardens by mixing an appropriate dose into one gallon of water before spraying over or near affected plants.

    Diatomaceous earth

    Diatomaceous Earth, made of fossilized algae, penetrates and dehydrates pests like potato bugs safely and naturally. While diatomaceous earth may cause skin or lung irritation for some individuals, wearing gloves and a respirator mask when applying can help you avoid getting it in your eyes and onto plants or soil to control infestations of potato bugs. As with most things pest-related, its effectiveness increases after being exposed to moisture, so its best used when you spot signs of pests or in areas they frequent – or both!

    Once a potato bug reaches its final larval stage, it burrows deep into the earth to pupate and await warmer weather to reemerge as an adult. You can prevent this by applying food-grade diatomaceous earth. This works by cutting into their exoskeletons to cause them to dehydrate while also blocking light to stop photosynthesis – so make sure that it only applies it where there are potato bugs present.

    To keep potato bugs away from your garden plants, it can help to add a layer of straw mulch over the soil. This will protect potatoes from direct sunlight as well as repel slugs and snails – commonly found garden pests. Straw mulch is available at most garden centers as bags or you can make your own from hay or straw mixed with garden compost.

    Partner planting is another natural method for combatting potato bug infestations. By growing marigolds, dill and thyme nearby to attract natural predators of potato bugs such as spider mites or ladybird beetles nearby can attract natural enemies for your potato bugs instead of having to resort to hand picking and other harsh means to manage populations of potato bugs. It’s also essential that each year you rotate where you plant your crops as potato bugs overwinter in soil from previous year’s crops and overpopulation can ensue resulting in overpopulation of potato bug populations and hand picking will become necessary as these bugs overwinter in soil from previous years’ crops that overwinter in soil from previous years’ cropped overwinter in soil from previous years and overpopulation of potato bug populations in subsequent years’ crops overwinter as repopulation occurs from prior years’ crops that remain present due to potato bugs overwintering in soil from previous years’ crops overwintering in soil from previous years’ crops that remains from previous years’ crops or change where your cropped each year due to overwintering overwintering of potato bug populations overwintering in soil from previous years’ crops harvested the previous years; changing where crops were planted annually is key as this way; otherwise potato bug populations will exist due to overwintering from previous years’ crops; therefore it’s wise a matter requiring change each year; changing where planting areas of previous years’ crops remaining from years’ crops overwintering during next springs cropped overwintering in prior year’s overwintering by overwintering in overwintering, since potato bugs overwinteringing.

    Neem oil sprays can be an effective home remedy for controlling potato bugs and other garden pests. Neem oil interferes with insect hormones, leading them to reduce feeding frequency and hamper breeding ability. To make a neem oil spray yourself, combine equal parts neem plant oil, peppermint essential oils and rosemary essential oils in a sterile spray bottle before filling it up with water before spraying onto plants where you see potato bugs.

    Neem oil

    Potatoe bugs are a significant problem in home gardens. These insects feed off of nightshade plants such as tomatoes and eggplants to cause considerable destruction, including potatoes. One effective method for eliminating potatoe bugs is spraying an organic insecticide like neem oil which also protects your plants against other bugs. Home remedies exist that may help as well; for instance neem oil provides an organic solution that won’t harm honey bees or beneficial insects in any way.

    Neem oil, produced from the seeds of neem trees, boasts antifungal and antibacterial properties as well as acting as an effective natural insecticide that has the power to kill or deter various bugs like potato beetles. You can purchase this oil at garden centers and mix it with other essential oils to create an effective spray for garden pest control.

    Neem oil can be applied directly onto affected leaves or soil and acts as a contact insecticide, deterring bugs from feeding on plants that will ultimately kill them. Neem oil also coats and smothers eggs of pests to stop their hatching and maturation – its bitter taste also deters most insects from biting through.

    One option for protecting plants against insects is making homemade insecticidal soap with household ingredients, using it to spray plants with. Simply combine two tablespoons of liquid soap per gallon of water. Stir the solution well before spraying over each surface of leaves and stems – this will help eliminate both adults and larvae simultaneously.

    Use a spray made of bacteria-based sprays to kill beetles without harming other plants in your vegetable garden. Bacillus Thuringiensis var. tenebrionis provides an environmentally-safe alternative to chemical pesticides that won’t harm bees or ladybugs while simultaneously controlling potato beetles and other garden pests. This natural insecticide will help keep potato beetles at bay!

    Beauveria bassiana, an entomopathogenic fungus that targets numerous pests, can also help control them without harming bees or pollinators. You can use it regularly to keep pest populations under control while helping avoid resistant strains forming in future years. This product is available from most garden centers.

    Bacillus thuringiensis var. tenebrionis

    Bacillus thuringiensis (Bt) produces an effective bacterial toxin that is non-toxic to mammals, birds and beneficial insects that is proven effective at eliminating Colorado potato beetle infestations. You can purchase it from specialist trade shops. Alternatively, use spray applications of Bt to kill pests while sparing beneficial ones; the effectiveness of such an approach makes its effectiveness all the more convincing. As with other products containing Bt, carefully read and follow label directions when applying this bacterium product.

    Bt toxin is a complex mixture of multiple protein fragments that becomes active when Bacillus thuringiensis sporulates and releases its spores coated with crystal proteins that are toxic to insect larvae when consumed by them. Cry1 delta-endotoxins produced by this strain tend to target lepidopteran insects; while hybrid Cry1Ba/CryIa toxins show increased effectiveness in controlling coleopteran insects such as Colorado potato beetle.

    Bt can be combined with other control methods to increase their effectiveness against Colorado potato beetle, increasing yields while decreasing damage caused by this pest. Field trials have proven this strategy more successful than either approach alone.

    Colorado potato beetle infestation can ravage an entire crop of potatoes if left unchecked, as well as eggplants and other nightshade vegetables like peppers and tomatoes. Although chemical pest control measures may help, Colorado potato beetles have developed immunity against most common bug sprays used against them.

    Pests can wreak havoc on potato yields by defoliating leaves and feeding on tubers; older larvae in particular are responsible for this damage, though potatoes can withstand up to 20% defoliation without adversely impacting yields.

    Growers looking to reduce beetle populations should plant crops using a rotation system and use barriers between fields; additionally they should use rough straw mulching as a delaying agent so beetles don’t discover their crop early on – particularly important when first discovered in May. Crop rotation should also take into consideration any threats from bacteria on crops that might feed beetle larvae that emerge and pose risks during crop production.

    As soon as temperatures warm up, potato beetles (Leptinotarsa decemlineata), native to the United States, begin multiplying rapidly and causing severe damage to potatoes, tomatoes, eggplants and other nightshade plants. They feed on leaves and stems of these plants causing significant defoliation while feeding on their seeds – also eating these vegetables from within!

  • Hunting Regulations in Florida

    Hunting Regulations in Florida

    Florida’s deer herd is an invaluable component of its natural resources, and FWC biologists regularly conduct monitoring of herd conditions, sex ratios and fawn production.

    Deer in Washington are divided into harvest zones (DMUs). These zones are determined by population and habitat quality; to hunt legally in each DMU zone, hunters must know its rules.

    Antlered deer

    Deer are a beloved species in Florida. Hunting seasons for deer vary throughout the year and regulations on harvest include season dates, bag limits and deer point restrictions. Climate, habitat and predators all play a role in whether a hunt will succeed; so it is wise to research these aspects prior to hunting deer.

    FWC has also implemented specific antler regulations based on each Deer Management Unit’s goals, so hunters may now harvest bucks with three points or more in certain units while two-point bucks may only be accepted in others. These changes were designed to increase both deer numbers and quality while increasing youth participation in hunting.

    Deer in Florida are exposed to multiple sources of stressors, such as competition for food and water resources, parasites, disease transmission and mortality related to hunting activities and human activities. All these issues can have detrimental impacts on reproductive success; leading to reduced litter sizes or in some cases no offspring at all being produced from each litter resulting from so much stress that reproduction simply ceases altogether.

    Whitetail deer in Florida tend to be smaller and shorter-legged compared to their counterparts in other states, typically weighing 100 kg (254 lb) at shoulder and standing over 90 cm (36 in), while adults from northern states often weight over 100 kg (254 lb). Adult buck deer from northern states are often over 90 cm (36 inches); deer found throughout Florida tend to be smaller and more compact in stature.

    Deer are herbivorous animals, similar to cattle. Deer consume large quantities of plant matter that they process through a complex, four-chambered rumen with 20 meters (66 feet) of intestines – this allows deer to consume food more efficiently and selectively while at the same time acting as selective feeders. Along with the rumen, deer have various digestive tracts which break down and digest material ingested; also as with many grazing animals they are susceptible to infectious diseases – biologists have identified over 120 different infectious agents and conditions found within deer bodies – many transmitted by biting midges (known as “no-see-ums”).

    Antlerless deer

    Are You Searching For Big Deer With Impressive Racks in Florida? Florida’s Panhandle region boasts numerous whitetail deer species – including trophy bucks – making Florida a premier hunting location each year. However, before making your journey make sure that you research Florida’s complex deer regulations and hunting zones.

    Deer are an intriguing part of nature and serve many important purposes. Deer are integral components of reproduction processes; mating, courtship and fighting for territory and mates all depend on them. Furthermore, deer provide food sources for other animals in the local ecosystem and serve as major food sources themselves. But these creatures remain vulnerable to numerous factors that can cause death and injury – for instance when colliding with cars and/or being hit by other vehicles; drowning incidents; becoming entangled in fences etc… These incidents can be prevented; first step should be informing people about these dangers so as to understand them better.

    Florida Fish and Wildlife Conservation Commission (FWC) is taking steps to boost deer population health across Florida by enacting new antler regulations across the state. Hunters will now have to carefully examine any buck antlers they find to ensure they comply with legal standards – this, according to FWC hopes, will lead to healthier deer with better reproduction rates and result in matured and healthier individuals being harvested by hunters.

    Hunters who wish to harvest antlerless deer must obtain a permit from the Florida Wildlife Conservation Commission (FWC), available online via their deer permit website. To apply, applicants must possess either a resident deer hunting or combination hunting/fishing license as well as be at least 16 years old and register their permits once purchased; once registered they can view and update their permits as well as upload all required documentation directly into FWC database for review before being informed about their status by FWC.

    Seasons

    Florida deer hunting seasons vary by region and zone, typically starting in late July for southern areas and ending around mid-October in the northern regions. Bucks and does are hunted at different times with different restrictions attached. Before purchasing licenses and permits to hunt deer in Florida, it is essential that hunters understand which season they are hunting in as this will impact when licenses and permits must be purchased and permits purchased; to hunt deer legally requires having valid hunting license, deer tag and hunter safety certification – any equipment needed depending on target deer being targeted should also be purchased prior to hunting deer in Florida.

    Florida hunters must also comply with restrictions regarding age and size restrictions when harvesting deer in Florida. Typically, hunters must harvest deer that are 1.5 years old or older to ensure herd health and promote growth; however there may be exceptions for hunters hunting certain zones and wildlife management areas.

    The FWC also regulates the maximum point count that any male deer can attain in order to ensure its health and readiness for breeding, and reduce the chances of chronic wasting disease spreading further.

    Deer herds in the northern states tend to boast more antlers than their southern counterparts due to Bergmann’s rule, which states that males from colder climates typically grow larger antlers than their counterparts in warmer regions. Adult whitetails found throughout northern states often weigh over 90 kg (200 lb), standing about 100 cm at their shoulders.

    Deer populations in Florida have seen a gradual decrease since 1800 due to unregulated hunting and cattle fever ticks; in order to restore populations, the Game and Fresh Water Fish Commission started stocking deer from various sources across Florida to restore herd numbers; along with eliminating screwworm fly infestations and banning adult female killing, this helped deer herds regain strength.

    Bag limits

    FWC recently implemented changes to bag limits that will impact deer hunters across Florida. Under these regulations, annual bag limits for antlerless deer hunters have been set at five and all harvest locations must be reported within 24 hours after hunting has taken place.

    The rules cover both public and private lands, including wildlife management areas. However, they do not apply to hunts conducted on licensed game farms or hunting preserves or deer harvested via private lands antlerless program permits/tags (which do not count towards your annual deer limit).

    Youth 15-years-old or younger may take any deer except spotted fawns under supervision from an adult 18 years or older. Young hunters can use rifles, shotguns, muzzleloaders and bows with legal sighting devices. Furthermore, all hunters must possess both antlerless permit and state deer permit validly issued before hunting begins.

    Hunters in Unit CWD may take three antlered deer during any general gun season (one per day up to three total). This limit can be exceeded through Earn-A-Buck program deer harvesting or replacement bucks; all deer must also be checked in by end of day.

    Florida law makes it illegal to import whole or undressed deer carcasses legally killed elsewhere into Florida, even if hunted. This includes deer transported by hunters from counties with Chronic Wasting Disease infected wild or captive populations. To reduce further spread, Florida Wildlife Conservation Commission (FWC) has restrictions in place based on each county’s status for moving carcasses around; please see CWD Carcass Transportation Restrictions for more details.

    Dogs

    Dog hunting can be controversial in Florida. Although using dogs to increase deer harvest rates can be effective, using these animals in violation of regulations carries with it risks that could see you fined up to $1,000 and losing hunting privileges for three years; their use also poses dangers to both wildlife and people alike.

    Deer are typically crepuscular in their activity patterns, being most active between dusk and dawn. This behavior serves to avoid predation from panthers who tend to be most active at these times. Deer have developed keen senses of smell and hearing which provide additional protection, survival and mating opportunities.

    As part of their annual antlered deer bag limit, there are also restrictions in certain deer management units (DMUs) which determine which deer may be harvested on private lands and state/federal WMAs. Youth hunters 15 years of age or younger are permitted to harvest one antlered deer annually that does not meet antler requirements on such land.

    Florida white-tailed deer herds tend to produce lower birthrates due to the energy costs associated with lactation and its subsequent nursing of calves, as well as tropical climate making forage scarce and birth rates unpredictable. Florida deer breeding cycles may also be affected by weather factors like rainfall and seasonal flooding that affect foal production rates.

  • How to Propagate a Jade Plant

    How to Propagate a Jade Plant

    While jade plants can easily be propagated from seeds, cuttings of leaves or stems may also be taken and planted into water as a method for propagation.

    To do this, first allow the scabbed end of the cutting to dry out before submerging it in water and dousing it in rooting hormone. Mist regularly and you should notice roots form within several weeks.

    Water Propagation

    As with stem cuttings, propagating jade plant by water requires creating a sterile environment and sterilizing tools. Rubbin alcohol can help both sterilize your tools as well as eliminate pesky insects that might invade the plants. Selecting strong but non-woody shoots that measure 7 to 10 centimetres long from a strong non-woody stem is ideal; remove lower leaves before leaving them to dry for two or three days before placing into their respective pots.

    Fill a small pot with succulent potting soil and ensure it remains damp. Jade plants are typically slow growers that do not require much feeding; however, you can use half-strength succulent fertilizer if necessary to foster their growth.

    Place the cutting in its container just below a leaf node, and add several drops of rooting hormone to jump-start the process of root growth. Don’t worry if you don’t have rooting hormone on hand; your jade plant will still sprout roots!

    Once the opening has healed, soak it again with rooting hormone to expedite rooting significantly.

    Once dipped in rooting hormone, insert your cutting into the prepared soil. Fill your pot up a bit more than needed so that there’s room around the sides and bottom for additional roots to form.

    If you prefer, another method of propagation for jade plants involves taking leaf cuttings instead of stem cuttings; this approach may be more difficult and take more time before producing an established plant.

    To successfully propagate a jade plant from discarded leaves, you will require healthy green leaves that are free from pests and disease. Choose one large plump leaf similar in size to those found on your parent plant and cut a section off at least four inches (10 cm) long using sharp pruning shears or knife.

    Soil Propagation

    If you want a straightforward method of propagating your jade plant, consider soil. Succulents tend to root very easily in soil, giving you an opportunity to keep an eye on its progress more easily than with cuttings. Just ensure the soil drains freely or else its roots may become waterlogged; to do this, use a standard plastic nursery planter with drainage holes filled with standard potting soil combined with some perlite for improved drainage, moistening it lightly – enough that the surface feels moist to touch.

    As you wait for your jade plant cutting to root, don’t be alarmed if its cutting begins to shrivel up as moisture escapes; once roots begin forming and grow, its leaves should plump back up indicating successful rooting of the cutting.

    Once the cuttings begin to develop roots, which should take approximately four weeks, transplant them into soil in containers with drainage holes so as to not clog up and kill their roots. After rooting is complete, place your new jade plant in a sunny location without drafts for optimal success.

    No matter whether you propagate by stem or leaf, propagating a jade plant is an easy and rewarding process that’s well worth your efforts. Just be patient; roots typically form within two weeks after propagating; once it does though, the resultant plants make gorgeous additions to any houseplant collection! For more tips and advice about propagating plants, download my free Plant Propagation eBook now – packed full of tips to help you grow stunning blooms of your own while including succulent propagation techniques as a bonus section – get your copy today by clicking below!

    Leaf Propagation

    If you don’t have the patience or time for stem cuttings to root properly, another alternative would be growing jade plants from individual leaves instead. While this method requires more work and dedication than stem cuttings do, the results are just as rewarding and worthwhile. When to use it: In summer when plants are at their fastest growth. When this method can have its greatest chance of successfully rooting.

    Begin by selecting a healthy, plump leaf. For maximum success, select one with bright green edges with deep rose tints and no signs of pest or disease damage. Next, identify an area on the leaf where roots have started growing out from nodes – using clippers or scissors carefully cut off a 3- to 4-inch section and place in water-filled container in a warm area until new roots begin growing from it.

    Roots should start to form within a month and you can transplant the leaf into a pot filled with succulent potting mix containing perlite for drainage purposes. Place it in direct sunlight, gradually decreasing watering frequencies until its leaves no longer need as much sustenance to keep from rotting away.

    Propagating jade plants from individual leaves year-round is possible, though this method takes more time for fully developed plants to emerge than water propagation does. Both methods are easy and will give you a new jade plant quickly! Good luck!

    Stem Propagation

    If you don’t have much space, but still wish to propagate a jade plant, try using the stem method. To do so, cut a long, firm section at one of the leaf joints; make sure it contains multiple nodes where roots grow quickly into new plants. The more nodes there are on a cutting, the faster new plants will develop.

    Take care in cutting with clean blades or sterilized clippers. Allow the cutting to dry in a warm area out of direct light; this step helps minimize risk for disease while speeding healing of any cuts made on surfaces that were cut during cultivation. Once it has dried completely, you can use it to start new plants!

    Step two is placing the cutting in a pot filled with succulent potting soil – easily available at most home and garden centers. Shears, rubbing alcohol and rooting hormone are also necessary – these powdery substances help jump-start the rooting process while the latter acts as sterilization tool and accelerates it further.

    Once your jade plant has been planted, water as needed to ensure its soil stays moist. When its soil dries out or it shows signs of overcrowding, repotting is needed using a pot with drainage holes and an additional tray to catch runoff and condensation.

    Though propagating jade plants from leaf cuttings may take longer, it can still be successful. To do so successfully, one should collect full, healthy leaves at least two to three centimeters long that do not have holes, scars, discolorations, insect damage or pest infestation. Also follow all curing and planting steps associated with this propagation method.

  • What Does a Tiger Lily Look Like?

    What Does a Tiger Lily Look Like?

    Gardenia notes one advantage of growing tiger lilies is their natural pest repellence properties, as well as their self-sowing habit that creates clumps that persist year after year.

    Tiger lilies are easy to care for and thrive in almost all climates and soil conditions. To maintain their best appearance, however, proper drainage and full sunlight are required for best results.

    Flower Color

    Tiger Lilies feature vivid orange petals covered in black or deep crimson spots that give their petals the appearance of being covered with the stripes and spots found on tiger skin. An Asian species that thrives in moderate USDA zones and can adapt well to many garden beds; their majestic looks make them ideal for borders or ornamental plantings – reaching an approximate maturity height of three feet as an adult plant. Spiritually associated with mercy, compassion and loyalty as well as being symbolic of wealth and success, Tiger Lilies symbolize spiritual values such as mercy compassion and success while being spiritually associated with mercy compassion and loyalty while symbolically signifying wealth and success – meaning these Asian beauties symbolically stand for each spiritual attribute they represent – mercy compassion loyalty wealth success symbolically represented by this flower lily!

    Tiger lilies thrive in sunny or partially shaded garden beds and can be planted individually or in groups. While requiring average watering needs, once established they become drought tolerant. TN Nursery recommends adding organic matter and mulch before planting your tiger lilies; additionally fertilizing two times each year with 5-10-5 liquid fertilizer helps encourage more flowers.

    As tiger lilies are susceptible to viruses, it is wise to separate them from Asiatic and Oriental varieties when planting them. Their proximity can spread diseases such as LIVMV which causes mottled blooms. Furthermore, red lily beetles and aphids often feed off them.

    Tiger lilies do not produce traditional flower seeds; therefore their propagation involves bulbil production. Tiny bulblets found along a spent bloom’s stem can be planted to produce new clones of that bloom in three years’ time. Another means of propagating these gorgeous blooms is dividing existing plants after they have died back or when their foliage turns yellow – an indicator of overwatering or poor drainage conditions.

    Flower Shape

    Tiger Lilies (Lilium tigrinum) produce bright orange flowers adorned with dark spots resembling those found on tiger skin, making this striking flower an eye-catching addition to any garden. Not only are tiger lilies attractive additions but they are also highly pollinators-attracting, drawing bees and butterflies into your garden, providing pollinator habitat, providing colorful backdrop for other flowers in your landscape and easily tolerate drought and sandy soil conditions – although full sun provides best results; additionally they create stunning displays when planted near water features like ponds or water features near or by!

    Tiger lily blooms typically open their petals in midsummer and last a few weeks, though deadheading can extend this bloom period further. Tiger lilies make great additions to sunny gardens of any kind and especially flourish when used as borders or focal points in formal settings.

    Tiger lilies may not be as demanding of care as other types of lilies, but they still require full sun and well-drained soil for optimal growth. Before planting tiger lilies in your garden, amend its drainage and fertility by mixing in compost or humus – this will improve drainage and fertility while mulching with peat moss, sand or straw is another effective way of amending its condition.

    Tiger lilies produce seed capsules which can be collected to propagate new plants, though it’s important to wait until all flowers have faded before harvesting them or else their seeds will disperse and fail to form healthy plants. Once harvested, seeds may be planted buried underground or spread throughout your garden to create future generations of tiger lilies.

    Flower Size

    Tiger Lilies bloom up to 3 inches (8 centimeters). Their petals curve downward and feature dark purple or black spots on their petals. Their long stems feature multiple blooms per stalk for added beauty in garden beds or flower containers as well as arrangements. Their beauty also makes a lovely cut flower.

    Tiger lilies can be relatively straightforward to care for, yet require certain conditions in order to flourish. Tiger lilies prefer full sun conditions with six hours of direct sun per day or partial shade and their soil should be well-draining with organic materials like compost or humus; heavy clay soil may require amending with additional compost or sand to improve drainage.

    Tiger lilies are drought-tolerant plants, yet thrive best in consistently moist soil. While not needing much water for growth, regular irrigation until their roots have established itself is recommended until then they can tolerate moderate levels of drought as well as weather extremes more readily.

    If your tiger lily has stopped producing flowers, this could be a telltale sign that it has outgrown its pot or the soil is no longer providing sufficient nutrition. Repot it into a larger container or move it outside to give your plant enough room to grow.

    As tiger lilies are widely recognized as symbols of wealth, they make an ideal present to celebrate significant life achievements like graduating college or finding employment. Furthermore, these flowers can serve as an expression of appreciation to someone who has worked tirelessly renovating their home or business.

    Flower Texture

    Tiger lilies are easy to grow from bulbs planted either spring or fall, and once established are low maintenance. Hardy perennials that will come back year after year with very minimal care required; their flowers are drought tolerant but should still be watered at least once weekly during spring and summer – when watering, make sure that enough soil moisture has soaked in so that when you press into it with your finger it sticks together quickly – excessive water can lead to yellowed foliage or no flower blooming at all! Overwatering could potentially result in yellowing foliage or no blooming at all – something overwatering can do.

    Tiger lily’s striking orange blooms with black or crimson spots resemble tiger skin, while its petals curve downward unlike those found on day lilies which feature trumpet-shaped blooms that point upward. Tiger lilies make an eye-catching border plant due to their height and spread. Tiger lilies add an abundance of color to your garden when combined with low-growing plants like Echinops (Globe Thistle), with its distinctive spikey blue blooms, providing the perfect complement to the slim stems of the tiger lily. Eryngium (sea holly) provides an interesting visual contrast with its round blooms and long, feathery leaves, while Cotinus, or smoke bush, makes for another suitable combination due to its similar shade of orange and long feathery leaves.

    Tiger lilies attract pollinators such as medium-sized butterflies and bees from Halictidae family bees, as well as bumblebees, which provide pollination services. Furthermore, their flowers serve as food sources for Scarlet Lily Beetles (Lilioceris lilii). If your Tiger Lilies seem damaged by pests during flowering period or post bloom period then use sterilized pruning tools after flowering to ensure your plants look neat and tidy for next season’s bloom.

    Flower Stamens

    Tiger lilies (Lilium tigrinum) are captivating flowers that add drama to any garden. Low maintenance plants that flourish under diverse growing conditions and attract pollinators alike, tiger lilies make a bold statement when planted front or back of borders or along borders; hardy perennials they can survive winter and bloom again come springtime.

    Flower stamens play an essential part in the reproductive system of tiger lily flowers, producing sperm which fertilize the eggs contained within its pistil. Each flower typically features six stamens that produce this fertilising force – typically lighter in color than petals – with dark anthers attached directly to them for pollen collection purposes. Each stamen also boasts long and tapering tips to capture pollen more easily while its long stamens feature round tips with long pollen trapping areas at their base to help capture it further while its sticky stigma at its top traps pollen from its anthers for pollen collection purposes.

    Asian folklore holds that the tiger lily symbolizes wealth and pride due to its spots, while also serving as an effective cure for coughs and tuberculosis.

    Tiger Lilies are relatively easy to cultivate from bulbs, making this an easy garden project for beginners. Simply plant the bulbs in early fall or early spring in a sunny spot with well-drained soil. Once planted, water the soil regularly until moist to the touch; though less frequent irrigation than other lilies may be necessary in order to keep its bulb from rotting away.

    Tiger Lilies can be propagated by either dividing their roots in spring, or taking cuttings from mature plants. If growing in clusters, carefully dig them up during dormancy and separate each individual bulb before replanting with pointed sides upward.

  • How Many CFLs Per Plant?

    How Many CFLs Per Plant?

    When purchasing CFL bulbs for your cannabis garden, wattage should always be taken into consideration. For maximum yields, at least 150W worth of bulbs is required per plant for maximum productivity; this equates to 6 small 23-26W bulbs or 4 medium 40-42W ones.

    Knowing the difference between wattage and lumens is equally as essential; oftentimes the labeled wattage on packages can be misleading.

    Wattage

    There are various lights you can use to grow marijuana, each offering their own set of advantages and disadvantages. Some growers swear by HID (HPS/MH), others prefer LED technology or CFL bulbs while still others use both approaches together for optimal results. Whatever kind of lighting system you decide upon for your marijuana plants, be sure to understand exactly how many watts each plant requires in order to see success.

    Wattage refers to the power consumption of bulbs and is measured in watts per hour. The value should typically be printed on their package or somewhere easily accessible for easy reference; higher wattages use more energy and generate more heat, with increasing wattages using more electricity while creating heat emissions. To know if a bulb is efficient enough, dividing its lumen output by its wattage value gives an indication of this information.

    For small spaces, low wattage CFL bulbs tend to be the best solution, providing great light penetration while helping keep your grow tent cool. For larger spaces however, higher-wattage bulbs might be necessary in order to avoid overheating your grow room.

    CFLs may not be the most energy-efficient lighting option available, but they’re still an economical solution for smaller spaces or those without enough money to buy more costly HPS and LED bulbs. Plus, when coupled with a timer they can help adjust to meet the various stages of plant development more effectively.

    Keep in mind that CFLs don’t produce as much light as other forms of illumination, so using a reflector or light-directing device is crucial to optimizing how much illumination reaches your plants and increasing yields. Furthermore, switching to Cool White (Daylight) color temperature once your flowers begin flowering as this provides additional blue lighting which encourages fruit production. A good rule of thumb would be using 150W worth of CFL bulbs per plant; which translates to 6 small 23-26W bulbs or 4 medium 40-42W bulbs per plant.

    Color Temperature

    Color temperature is a system for assigning numerical values to various colors on a spectrum, from warm (red/orange) to cool (blue). Measured in degrees Kelvin, this temperature reflects how radiative materials produce light of certain wavelengths.

    Understanding the color temperature of your bulbs is vitally important for plant growth, particularly marijuana plants that require specific spectrums of blue and red light to flourish. CFL bulbs designed specifically for growing marijuana may provide this light; the best way to do this would be buying one specifically labelled for growing weed.

    Wattage is another key consideration when determining how many CFL bulbs to use in your marijuana garden. A higher wattage bulb will produce brighter light output and help your plants absorb more light to increase yields and produce greater harvests; but remember, that doesn’t always equate with light output!

    CFL bulbs that resemble natural sunlight, such as 6500K bulbs, are ideal for vegetating. You’ll find these at most hydroponic stores. When it comes to flowering stage lighting, 2700K bulbs emit warmer orange hues that help transition plants to adulthood stage more smoothly.

    Consider looking at your bulbs’ lumens rating to gain a more accurate idea of the amount of light they will provide; this value will be listed on their packaging. Generally speaking, for best results use at least 10,000 lumens per plant in order to provide enough illumination.

    Notably, plant needs vary throughout their lifecycle and, to meet them adequately, you will require more CFLs during vegging than flowering; red and blue light is needed during vegging while more yellow/green hues will help your plants bloom successfully in flowering mode. It is therefore vital that you follow your schedules closely; otherwise your plants might never reach their full potential!

    Lumens

    CFLs can be an ideal lighting option for those wanting to grow plants in their home or office without having the space or time for setting up HID (HPS, MH), LED, or similar lights. Not only are they cheaper and generate less heat than their alternatives, they’re also much simpler for setting up. Unfortunately though, CFLs do have some drawbacks; not producing as many lumens compared with other lighting sources and not suitable for flowering plants which require greater illumination than they provide.

    The number of watts consumed by your bulb is an essential element to its light output, and should play an essential part in its ability to illuminate your plant. As more light comes through with more wattage being consumed by each bulb. You should strive to use as high a wattage possible without overheating your space – the packaging usually indicates this number as an important indicator.

    Consideration must also be given to the color temperature of a bulb, which is determined by its wavelengths of visible light emitted by it. An ideal grow light would emit wavelengths that closely resemble that of sunlight – this will enable your plants to absorb more usable light for photosynthesis. Kelvin measures color temperature; lower numbers represent warmer hues. CFLs designed specifically for growing marijuana should fall between 2700K to 6500K for optimal performance.

    Kelvin rating is essential when it comes to both vegetative and flowering stages of plant development, since each requires its own spectrum of light. Vegetative plants require more blue and red wavelengths while flowers need orange and yellow wavelengths in their spectrum for proper flower development.

    When selecting the appropriate wattage for your garden, the distance between bulbs and plants should also be taken into consideration. Too-close bulbs cannot properly illuminate plants; rather, you should place bulbs 4-6 inches from plants so as to avoid burning them out. Furthermore, reflectors can redirect some of the light emitted by bulbs onto specific parts of your garden.

    Energy Efficiency

    CFLs use one-fifth to one-third the electricity consumed by standard incandescent bulbs and typically last eight-15 times longer, as well as contain toxic mercury that must be handled and disposed of responsibly when they reach the end of their lives. Many companies have implemented systems to recapture mercury vapor from used CFLs for recycling; such measures might include negative pressure ventilation systems with cold traps for capture purposes; while some cities are using machines which crush bulbs into pieces before collecting glass, metals, and mercury for recycling purposes.

    Energy efficiency of bulbs is measured in terms of lumens produced per watt of electricity consumed, as indicated on their packaging. As luminosity changes over time with ageing bulbs, lumens should be stated at their “peak performance,” not the start of life for an accurate assessment.

    CFLs have become a key tool in efforts to reduce electricity use. Distributed directly or via programs provided by electric utilities or local governments, many organizations promote them as an efficient means to do just that. Some even require residents switch to CFL bulbs as part of an energy conservation initiative offered by their utility provider.

    These groups argue that switching to CFLs could save enough electricity to offset Hg emissions from coal plants, the primary source of Hg emissions in the US. Even if every household adopted fluorescent lighting, however, any amount saved from coal plants will likely remain minimal.

    Another issue with these claims is their assumption that all energy saved will come from coal-burning power plants; while some will, other forms of electricity produce negligible amounts of mercury compared to this estimate; as a result, CFL use will likely save far more Hg than anticipated by these estimates.

    Noteworthy is the fact that one CFL emits mercury at levels much higher than California standards allow; approximately 500 billion pounds of fish could be contaminated each year based on one CFL alone!

  • Why Choose IPTV UK

    Why Choose IPTV UK

    I purchasing a Uk iptv subscription from us grants access to over 24,000 high-quality channels, with the majority in 4K ,HD quality, and a vast selection of video-on-demand content. Our coverage includes numerous countries globally, such as the USA, Canada, UK, Italy, Spain, UAE, Germany, France, South America, Turkey, Afghanistan, Russia, Poland, and many others.

    Our iptv service uk is VPN-friendly if you prefer to use one, but it is not required. In addition, we have a responsive customer support team available to assist with the setup of our system on any device you choose to use. Our channels are highly stable and, in addition to the majority being in HD quality, we have an EPG installed, enabling users to view the schedule of upcoming programs, similar to a TV guide.

    We offer a free Android app that can be downloaded once you become a customer, providing a seamless viewing experience on any Android device or Amazon Firestick. As a long-standing provider, we offer the most extensive selection of channels and worldwide streams, covering most countries globally.

    It is possible that you may need to use a VPN when using our services, particularly when watching football matches. We have provided a guide below for more information.

    Using a VPN with IPTV services can help to ensure privacy and security by encrypting your online activities and protecting your IP address from potential threats. It can also help to bypass geographic restrictions and prevent internet service providers from throttling your internet speeds. We recommend using a VPN when watching free movies or anything using the Cinema HD app. Our Best VPN for IPTV Blocks article provides more information on why this is necessary. If you plan to use a VPN, we suggest using a high-quality VPN service like the one we recommend that offers significant discounts (up to 70% off) and is optimized for movie streaming and compatible with devices like Android boxes, Firesticks, Windows, laptops, and more.

  • How Many Seeds to Plant in a Pot

    How Many Seeds to Plant in a Pot

    Many vegetables and flowers thrive when multiple seeds are planted per hole, cell or pot. Once germinated, thin out seedlings until only one strong plant remains per “spot.”

    Planting too few seeds could leave space under your lights unused as well as extra seed starting mix lying around. To prevent this, it’s essential that you determine how many seeds should be planted at once.

    Germination Rates

    Have you ever planted seeds before, whether in a tray, container, or directly into the ground? Not every seed sprouts; many factors influence germination rates; once you understand these, you’ll be better able to decide how many to sow in any given location or container.

    On its packaging, seeds often list their germination rate; this percentage – usually out of 100 – refers to how many seeds will germinate when all growing conditions have been met.

    To determine the germination rate of seeds, a sample is planted and monitored over time for signs of germination. As each seed germinates, its Germination Percentage (GP) can be calculated and used to predict how many seeds will sprout at planting time.

    Higher germination rates increase your odds that all the seeds will germinate, giving your garden plenty of plants. On the other hand, failure of even one seed to germinate could render an entire batch useless and lead to wasted money and effort.

    Size also plays an important part in seed germination rates. Smaller seeds tend to sprout quicker, though even those that appear promising can fail if planted too deep or have other issues. It is always wise to plant multiple of each kind of seed type before thinninf them out after germination has taken place.

    Seeds that have been stored too long often fail to germinate, so proper storage is vital. A cool and dry place like a glass jar should keep them alive until you’re ready to plant them. If in doubt as to how long your seeds have been sitting around, put a few in wet paper towel for 24 hours and see what happens; if nothing appears then they likely aren’t worth planting.

    Seed Size

    Seed size is an integral factor in the ability of seeds to germinate, grow and form strong seedlings, as well as their distribution, abundance and dispersal rates. Seed size has evolved through time due to multiple selection pressures; thanks to advances in phylogenetic methodologies and broad comparative data sets we are now able to trace its development across major plant groups.

    Large seeds usually require less potting mix to germinate and flourish into plants than their smaller counterparts, prompting many gardeners to use a “quarter-inch” planting depth even though many crops require two or three times deeper planting depth than the width of their seeds. Plants planted too deeply lose energy trying to reach sunlight through layers of soil; eventually either they won’t sprout at all or succumb altogether.

    Typically, one seed should suffice per hole, cell, or pot for crops such as squash, tomatoes, peppers, kale and broccoli – this allows you to save space under your grow lights as not all the seeds will sprout; with one exception being strawberries which should be planted individually.

    No matter how many seeds you sow, always follow the specific instructions on your seed packet. Furthermore, it may be worthwhile checking out the back side for information such as how many to plant per square foot to conserve space and prevent overcrowding, which can hinder airflow and lead to fungal issues in a Tower Garden.

    If using a microscope to assess seed size measurements, there are a few ways that can be utilized: box measurement which involves simultaneously and perpendicularly measuring length and width simultaneously and perpendicularly, as well as line measurements which measure distances between two points on a seed (best used with seeds that have simple shapes); line measurements which involve measuring distance between two points on an irregularly-shaped seed). Calibration should always be ensured before carrying out either method for accurate results.

    Soil Conditions

    Seeds only flourish and take root when their environment is suitable. Soil characteristics like texture and nutrient content determine its suitability for plant life; some are naturally better structured than others, but through effective management practices can improve conditions to facilitate healthy plant development.

    Soil texture is determined by a combination of clay, sand and silt particles as well as organic matter content, with these components combined dictating its texture and the ease with which water and air move through it. Soils with poor drainage such as sandy, rocky or sand-like qualities often have poor drainage as water cannot readily infiltrate into them and instead pools on top causing root oxygen deprivation leading to plant death or even wilting and death of roots.

    Soils that are too clayey are hard and compacted with very limited pore space. Heavy traffic in garden beds and vegetable gardens causes compaction that reduces pore sizes, making water harder to penetrate and bulk density rise, decreasing air exchange in the soil. This in turn decreases aeration.

    Loamy soils make the ideal gardening soil, boasting a blend of sand, silt and clay particles for optimal structure, moisture retention and ease of cultivation. Loamy soils should be replenished regularly with organic matter to retain nutrients in them and maintain an ideal structure.

    An effective rule of thumb when planting seeds is to set them at twice their width, as per instructions or experiment. When in doubt, it’s better to plant shallower so as to decrease any risk of being buried by too much dirt. This way, they’ll have enough light for proper germination.

    As some seeds such as squash, tomatoes and peppers require the sunlight for growth to sprout, too much potting mix could prevent their ability to do so.

    Light

    Many seeds require light to break through their protective seed coats and germinate, meaning if these seeds were covered in soil they couldn’t access any sunlight needed for their development. Therefore it’s crucial that before beginning planting any particular type of seed it is important to understand its expected germination rate which should be included on its seed packet or online source (ie: Amazon). This information can usually be found there or can also be easily found online.

    When gathering this information, remember that it reflects an average germination rate for that species and will differ depending on which plant species is in question. A typical seed packet might indicate that begonias and geraniums have an average germination rate of 70% – although this serves as a good starting point, you should also factor in other variables, including number of seeds planted and expected timeframe for their development before they can be planted out into your garden.

    As part of your research process, pay special attention to the instructions included with each seed packet. This will provide an estimate of the optimum planting depth for each type of seed – this is vital because some may need to be planted deeper so they can break through the soil surface, while other are meant only to be minimally covered by dirt.

    As a general guideline, when planting seeds you should do so to the depth that is three times their thickness. So for fat bean seeds this means planting one to three inches deep while thin carrot seeds only require light coverage. Most seed packages provide guidance as to what their optimal planting depths are for each variety.

    Once your seedlings have germinated, it’s essential that they get enough light so they can reach their full potential before transplanting them to the garden. This is especially true when indoor gardening vegetables and herbs. Most seedlings require 12-16 hours of intense illumination a day to prevent becoming weak and leggy; you can achieve this using high-intensity grow lights or simply placing them near sunny windows regularly rotating them so they don’t become leggy or too lean.

  • What is a COB LED?

    What is a COB LED?

    COB LEDs represent an exciting breakthrough in grow lighting technology. Packaged together and directly attached to substrate, these bare LEDs appear as one big light source.

    Results in much brighter light with better panel uniformity than older LED panels, making them ideal for photographers and filmmakers.

    What is a COB LED?

    COB LED technology is an innovative lighting solution, employing an array of individually mounted LED chips to form one light source with outstanding illumination uniformity. As one of the newest advances in LED technology, it is increasingly being implemented into professional lights such as those offered by some of today’s highest-tier manufacturers.

    COB LEDs contain more diodes and cover a larger surface area than traditional LED bulbs or strips, leading to greater lumens per watt and brighter, higher-quality beams of light with less energy consumption and reduced durability issues. COBs also use less energy while using less power overall; their simpler design makes COBs more reliable due to fewer failure rates compared with SMD LEDs.

    As an added benefit, COB LEDs offer a wider beam angle than other types of LED lighting solutions, giving you access to more illumination in tight spaces. Furthermore, their more flexible construction enables them to bend into different shapes without losing brightness or efficiency.

    COB LEDs also boast the advantage of being very durable, with longer lifespan than other types of LEDs. Their increased longevity results in less breakdowns and repairs needed, making them a cost-effective lighting option for commercial applications.

    COB LEDs differ from other forms of LED lights in that they do not produce light through filaments like regular incandescent bulbs, making them less susceptible to vibration. This makes them an excellent choice for indoor growing as they can withstand vibration and other environmental factors that would normally damage other types of LED lights.

    COB LEDs also boast superior heat sinks than other types of LED lights, helping them regulate temperature more effectively and avoiding premature failure – translating to increased lifespan and performance efficiency in your grow. Furthermore, their accurate color spectrum contributes towards photosynthesis and plant health.

    What are the advantages of COB LEDs?

    COB LED lights represent the latest innovation in LED lighting technology. Constructed of an array of LED chips packed tight together on one silicon carbide substrate, COB lights boast numerous advantages over traditional LEDs in terms of energy efficiency and illumination uniformity, making them suitable for applications such as photography and filmmaking.

    COB LEDs boast several distinct advantages over their SMD counterparts, most notably increased brightness due to smaller LED diodes that can be packed more densely into a circuit design that does not need to accommodate as many individual diodes.

    COB LEDs boast the additional advantage of being more durable than SMD LEDs due to the direct bonding of chips onto substrates – no need for spot soldering – which reduces failure risk and extends their product’s lifecycle.

    COB LEDs are more eco-friendly than SMD LEDs due to producing less heat and having lower power consumption, and providing wider viewing angles than their counterparts, making them suitable for various applications.

    COB LEDs may not yet be as widely available, but they’re slowly beginning to gain market traction. COBs boast many advantages over traditional LEDs such as increased brightness, better color mixing, greater optical benefits and less maintenance needs than SMD LEDs.

    COB LEDs’ primary drawbacks are limited color options; however, this can be rectified using a color filter. Furthermore, COBs tend to be more expensive than SMD LEDs.

    COB LEDs may present some challenges in terms of power efficiency; nevertheless they have become an increasingly popular choice within the lighting industry. Their wide range of applications encompass everything from commercial to residential lighting applications; in fluctuating voltage systems like off grid solar, wind turbine generators or marine boat battery systems they are often the superior option.

    What are the disadvantages of COB LEDs?

    COB LED lights offer several advantages over SMD LEDs: they’re smaller, more efficient, less costly, more robust and long-lasting – yet if choosing COBs is an important part of your photography setup it should be taken into consideration when selecting an ideal light for you. But they do come with some downsides that should be kept in mind before selecting one as the ideal source.

    COB LED lights boasting more LEDs in a smaller space are capable of producing much higher lumens per square inch than their traditional SMD counterparts, making them suitable for use in photography and videography applications that require bright lighting conditions.

    COB LEDs produce a more uniform beam of light, helping eliminate shadows and other artifacts more effectively and are therefore popular among photographers and filmmakers.

    Due to their powerful and long-lasting construction, COB LEDs generally experience lower failure rates than other forms of LED lighting. However, it should be remembered that any time any one of the diodes inside a COB LED chip suffers any form of damage, the entire chip becomes nonfunctional – making repairing more complicated and expensive.

    COB LEDs have limited spectrum options. Since they contain multiple LED chips, the color temperature will depend on their combination and cannot be changed like it can with traditional SMD LEDs.

    Although there are many brands of COB lights on the market, it’s essential that you select one which meets your individual needs. For instance, when lighting is needed for photography or videography purposes, then selecting one with high output wattage that can be controlled with wireless remote is ideal. Also important when purchasing COB lights are those which feature low fan noise levels as these will ensure smooth operation over time.

    What are the applications of COB LEDs?

    COB LEDs have gained widespread acclaim within the lighting industry due to their brighter and more energy-efficient light output, making them increasingly sought-after applications like streetlights, traffic signals and indoor commercial and residential lighting. COB LEDs’ greater energy efficiency also makes them suitable for applications where space may be restricted – perfect for street lights where traffic signals must produce light efficiently while at the same time producing equivalent brightness with smaller volumes of space required for traditional bulbs.

    COB LEDs are often utilized in photography and videography lighting applications, especially photo and video lighting for photojournalists and videographers. Their soft lighting makes for beautiful imagery. Furthermore, studios use COB lights to add drama to images for dramatic or engaging photos.

    COB LEDs also boast an exceptionally high lumen per watt ratio, meaning they produce more light for less power consumption – something which helps lower lighting system costs significantly. Furthermore, these compact devices may make an ideal solution for applications where space is at a premium.

    COB LEDs also tend to be less susceptible to heat buildup than SMD LEDs due to being packed closely together, helping prevent excess heat from gathering on their surface of each chip. Furthermore, these types of lights typically have lower failure rates compared to their counterparts which increases reliability within systems.

    COB LEDs offer greater versatility than SMD LEDs, as they can be utilized in numerous configurations. For example, linear and panel lights or single spot lights could all benefit from using COB LEDs instead. Furthermore, COB LEDs are more energy-efficient than their SMD counterparts which helps decrease operating costs significantly.

    COB LEDs’ primary limitation lies in their lack of color options compared to SMD LEDs; this may pose problems when trying to use the lights for color changing purposes; however, solutions exist that allow users to modify the spectrum of a COB LED by altering its phosphor mix – either via changing its settings directly on its chip itself or through an external controller.